
· 5 min read
Nate Totten

One of the biggest benefits of an API Gateway is that it provides an abstraction layer between your clients and your implementation. This layer allows your backend to be unaware of various API implementations and configurations, including authentication, authorization, and rate limits. This separation of concerns also makes it possible to swap out specific implementations in a single place - your gateway - without having to rewrite a large amount of backend code.

We have assisted Zuplo customers with migrating to new authorization providers, such as switching from AWS Cognito to Auth0, or to an entirely new authorization system, such as moving from JWT to API Keys. Typically, this type of migration would require changes to your API implementation. In the simple case where you have a single service, this might be fairly straightforward. However, in practice, customers often have many services, each of which needs to implement the same authentication service. Regardless, an API gateway can greatly simplify the migration process.

Separation of Concerns

When migrating authorization providers, the first step is to ensure a clean separation of concerns. This means that only the API gateway should handle client-facing authorization. By cleanly separating the layers, future changes will be much easier to make.

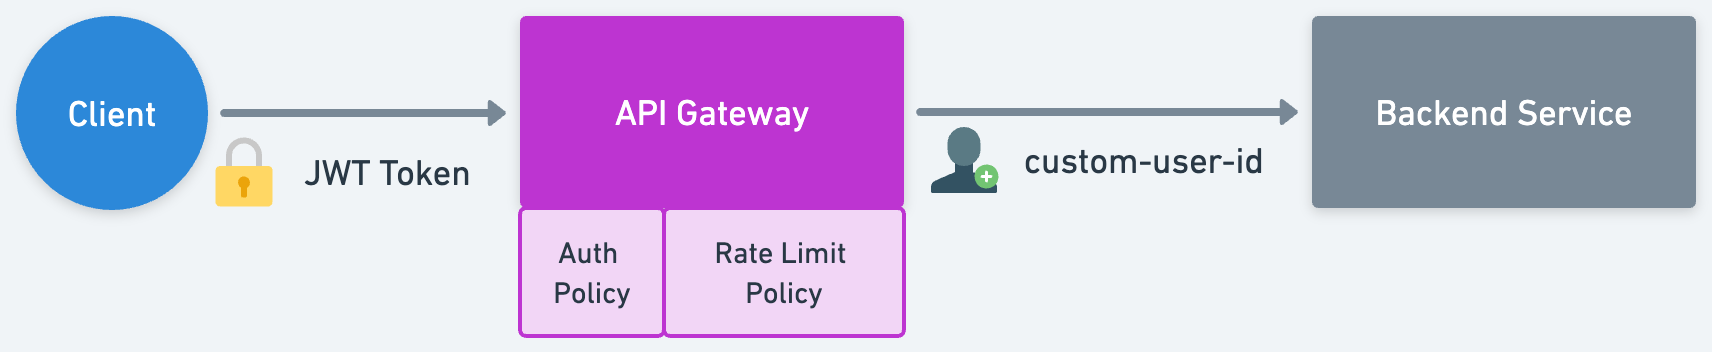
A pattern we often recommend to customers who are migrating to an API gateway is to pass authorization information to the backend via an HTTP header. This model means that your backend trusts the API gateway to have already authenticated the client - this is referred to as a trusted subsystem design.

What this means is that instead of the backend service receiving say the Authorization header directly from the client, it would receive something like a custom-user-id header that would contain the user’s ID (or sub, etc.). Your service would be setup to trust that the request from the gateway is pre-authorized. Of course this requires the establishment of a trusted relationship between the gateway and your service. Setting that up is beyond the scope of this article, but you can see options supported with Zuplo in our documentation.

Auth Diagram

Authorization at the Gateway

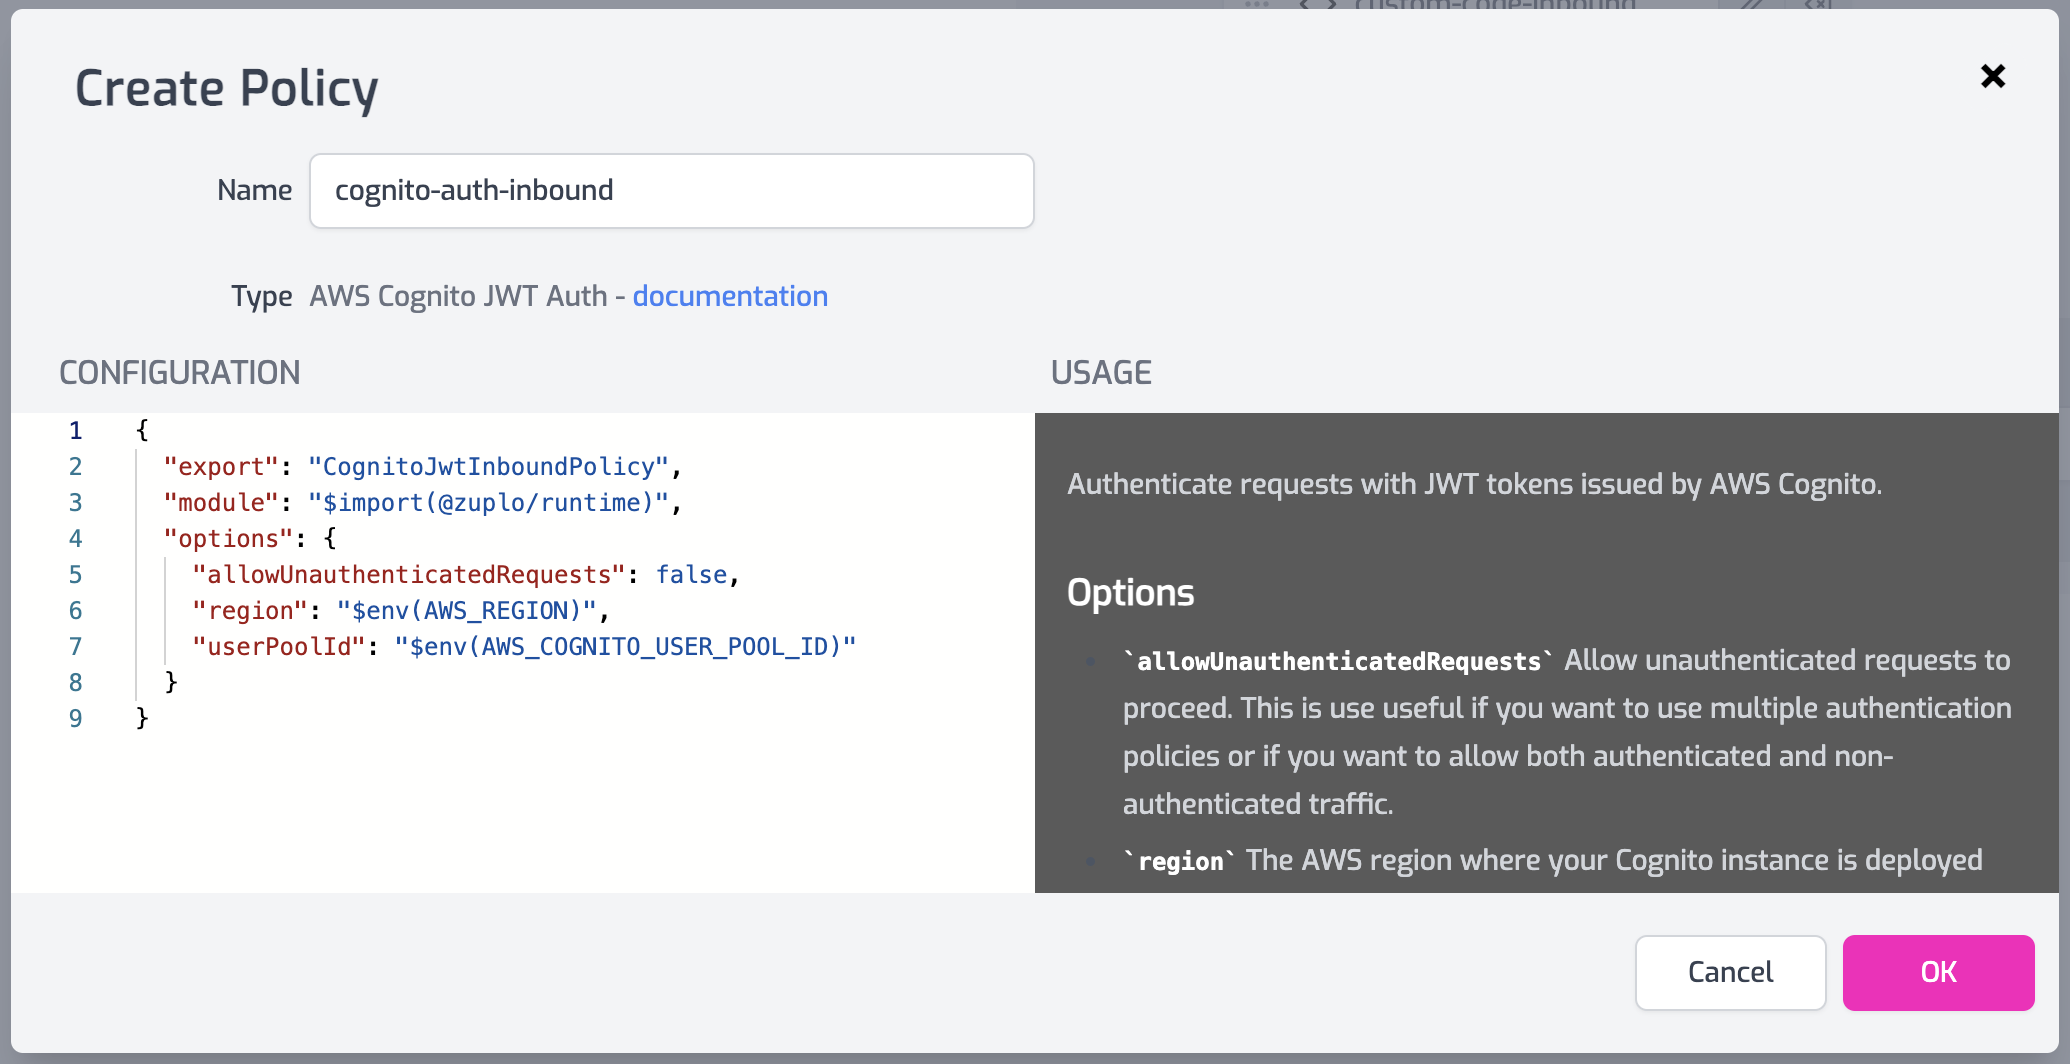
With the backend service setup to trust the user information from the gateway, the next step is to actually perform the authorization for your current authorization provider. With Zuplo this is typically done using one of our built-in policies like Auth0 or AWS Cognito JWT authentication.

AWS Cognito Policy

With authorization handled, the gateway next needs to be configured to pass the user information to the backend. In Zuplo this can be done by adding a Custom Code Inbound policy. This policy is configured to take the user.sub value that was extracted from the JWT token and add it to the custom-user-id header. The policy's code is shown below.

import { ZuploContext, ZuploRequest } from "@zuplo/runtime";

export default async function (request: ZuploRequest, context: ZuploContext) {
const headers = new Headers(request.headers);
headers.set("custom-user-id", request.user.sub);
return new ZuploRequest(request, { headers });
}

With these steps in place the current authentication provider is now running on the gateway and the backend receives the authorization information via headers.

Multiple Authorization Providers

In order to migrate clients to the new authentication provider with zero downtime, it is necessary to support multiple authentication providers for a period of time. With Zuplo this is extremely easy. By default, the authorization policies in Zuplo are configured to return unauthorized responses if the request doesn’t contain valid authorization credentials (i.e. a JWT on the Authorization header). However, each provider can be configured to allow unauthenticated requests, thus allowing multiple providers to attempt to authenticate the request.

To change the first authentication policy set the the allowUnauthenticatedRequests property on the policy to true.

{
"name": "my-cognito-jwt-auth-inbound-policy",
"policyType": "cognito-jwt-auth-inbound",
"handler": {
"export": "CognitoJwtInboundPolicy",
"module": "$import(@zuplo/runtime)",
"options": {
"allowUnauthenticatedRequests": true,
"region": "$env(AWS_REGION)",
"userPoolId": "$env(AWS_COGNITO_USER_POOL_ID)"
}
}
}

Next, add a second authentication policy. This policy will also have the allowUnathenticatedRequests property set to true.

{
"name": "my-auth0-jwt-auth-inbound-policy",
"policyType": "auth0-jwt-auth-inbound",
"handler": {
"export": "Auth0JwtInboundPolicy",
"module": "$import(@zuplo/runtime)",
"options": {
"allowUnauthenticatedRequests": true,
"auth0Domain": "$env(AUTH0_DOMAIN)",
"audience": "$env(AUTH0_AUDIENCE)"
}
}
}

Now with both of these policies set to allow unauthenticated requests, the API is left unsecured - both policies will allow requests even if the user is not authenticated. In order to require that each request is authenticated, we need to add a third policy that runs after both of these policies that enforces authentication. This can be done with a second Custom Code Inbound policy. The below example custom policy checks if the user sub is set, if it isn’t it means neither auth policy succeeded so we return unauthorized.

import { ZuploRequest, HttpProblems } from "@zuplo/runtime";

export default async function (request: ZuploRequest, context: ZuploContext) {
if (!request.user.sub) {
return HttpProblems.unauthorized(request, context);
}
return request;
}
note

For more information about the HttpProblems helper see documentation

Migrating Clients + Cleanup

With your API gateway now supporting both authentication providers, clients can be migrated to use the new provider. Once all the clients are migrated, the old provider can be removed. You can also remove the custom authorization policy and set the one authentication policy’s property allowUnauthenticatedRequests to false.

If you need to encourage your clients to migrate to the new authentication policy see our post on versioning an API for some helpful tips.

· 4 min read
Josh Twist

"Zuplo has really delivered. We’re an API-first company... We have great performance. We have great observability. It fits with our platform.” - James World, System Architect at Imburse

Imburse Payments are a leading payments middleware provider for the insurance market. As an API-first company, their choice of API gateway is a critical decision. Recently, I got to interview James World, System Architect, and (Andrew Withers, SRE at Imburse)[https://www.linkedin.com/in/andrew-withers-3a651096/], about their decision-making process that led to them going live with Zuplo.

Imburse primarily used Microsoft Azure as their cloud and hosting provider and so their default choice is to use services provided by Microsoft, in this case, they looked at Azure API Management (founded by me, Zuplo’s CEO when I worked at Microsoft) but decided that Zuplo was a better fit for their needs.

They highlighted several motivations for them in looking for a gateway and making the final decision to use Zuplo. They have a modern, microservice-based architecture and had been using the common approach of routing requests based on embedded Kubernetes features, but realized it was time to “up their game” and add rate-limiting and a cleaner, more consistent way of implementing security, authentication, and observability.

James and team are passionate about the developer workflow and invest heavily in having an optimum workflow that supports their agile approach. “We're able to make changes very quickly. And so we've always taken the approach of having an automated deployment pipeline, from that first push all the way through to automated testing and getting things into production. Our goal is that we are able to get changes into production, ideally within minutes.” said James, “If the tool can't support that goal, then we don't like it.”.

Andrew added, “It’s very important for us to follow a GitOps approach to deployment. We tried to use Azure API Management, and it was far more challenging than it needed to be — most gateways just don’t lend themselves well to this approach. When we saw how Zuplo worked and how clean it would be, it was a bit of a blessing.”

Imburse are also making heavy use of Zuplo’s native programmability — “I was able to put together prototypes of custom policies and custom rate-limiting algorithms and test them in literally minutes.” notes Andrew. “We actually have three levels of rate-limiting now - a custom rate limiter for users who are coming in through an authenticated flow where we can identify the organization that they work for. A fallback for a different type of authenticated user, and then we have another fallback for IP-based rate limiting. So even our anonymous methods are being rate limited now.”

They also care deeply about observability, and it was important that their chosen solution would work well with their preferred observability platform — Datadog.

“We wanted a holistic view of our estate, and we didn’t have that before Zuplo. if we wanted to look at calls coming into different parts of the system, we would have to go into individual services and go query those individually. By sort of introducing Zuplo and adding in the Datadog plugin, we were then able to create views that showed us all requests across all APIs in one view, which was really powerful. Really important. It allows us to very quickly pinpoint errors and spot problems as they're happening. It also allows us to get insights into some of the API design decisions that have been made over the years. So we're sort of starting to see patterns that we maybe wouldn't have spotted before”, notes Andrew,”It has really helped me in my role as a Site Reliability Engineer - given me lots to focus on!”

“Zuplo has really delivered. We’re an API-first company, and it's absolutely vital that our customers understand how our product works. They have to have a clear understanding of the APIs, they have to have confidence that what our documentation says those APIs do and how they work is actually how they work. So the fact we're able to tie our documentation, our specifications, and how we do deployment all together means that we can really nail that consistency. We have great performance. We have great observability. It fits with our platform.”

Check out the video interview with James and Andrew:

· 2 min read
Josh Twist

At Zuplo, our mission is to revolutionize API management by modernizing and democratizing the API Gateway. We have made significant progress in achieving this goal by focusing on two key objectives:

  • making API gateway adoption effortless
  • reducing the cost associated with its purchase and management

Historically, smaller businesses have avoided advanced API Gateway tools due to their complexity and high costs. However, Zuplo has successfully addressed these challenges, making our gateway incredibly easy to learn, adopt, and manage. By doing so, we have enabled large customers to save over 80% on the sticker price of products like Apigee and Kong, while also providing a fully-managed solution that includes hosting costs and eliminates the need to manage K8 clusters and scaling.

Introducing new Pricing for our Builder Tier

Today, we are thrilled to announce a major update to our pricing structure, specifically for our Builder tier. Previously priced at $100 per month, the Builder tier offered customers the ability to have a custom domain—an essential feature for most API launches. In line with our mission of reducing barriers to entry, we are excited to reveal that we have lowered the price of our Builder tier by 75%, making it now available for just $25 per month.

Unbeatable Value

That really is incredible value, including

  1. Fully Managed API Key Solution: Simplify your API management with our comprehensive API key solution.

  2. Extensive Out-of-the-Box Policies: Benefit from numerous pre-configured policies such as JWT authentication and rate-limiting. Explore the complete list of policies here.

  3. Developer Portal: Engage your developers with an intuitive developer portal, featuring API references and integrated self-serve API key management.

  4. Unlimited Deployed Environments: Enjoy the freedom to deploy your APIs in multiple environments without any restrictions.

  5. Fast Deployments to Global Data Centers: With Zuplo, your API will be accessible worldwide, as we offer lightning-fast deployments to 300 data centers across the globe.

And, what's more, you can now add additional users (up to a total of 4) for just $25 per month/user and $25 for an additional custom domain. For customers that need more users, domains and an SLA, our Business tier is still aggressively priced at just $500 / month.

zuplo.com/pricing.

We can't wait to see what you build 💪.

Got questions? Join our Discord.

· 4 min read
Josh Twist

"Zuplo has really delivered. We’re an API-first company... We have great performance. We have great observability. It fits with our platform.” - James World, System Architect at Imburse

Imburse Payments are a leading payments middleware provider for the insurance market. As an API-first company, their choice of API gateway is a critical decision. Recently, I got to interview James World, System Architect, and (Andrew Withers, SRE at Imburse)[https://www.linkedin.com/in/andrew-withers-3a651096/], about their decision-making process that led to them going live with Zuplo.

Imburse primarily used Microsoft Azure as their cloud and hosting provider and so their default choice is to use services provided by Microsoft, in this case, they looked at Azure API Management (founded by me, Zuplo’s CEO when I worked at Microsoft) but decided that Zuplo was a better fit for their needs.

They highlighted several motivations for them in looking for a gateway and making the final decision to use Zuplo. They have a modern, microservice-based architecture and had been using the common approach of routing requests based on embedded Kubernetes features, but realized it was time to “up their game” and add rate-limiting and a cleaner, more consistent way of implementing security, authentication, and observability.

James and team are passionate about the developer workflow and invest heavily in having an optimum workflow that supports their agile approach. “We're able to make changes very quickly. And so we've always taken the approach of having an automated deployment pipeline, from that first push all the way through to automated testing and getting things into production. Our goal is that we are able to get changes into production, ideally within minutes.” said James, “If the tool can't support that goal, then we don't like it.”.

Andrew added, “It’s very important for us to follow a GitOps approach to deployment. We tried to use Azure API Management, and it was far more challenging than it needed to be — most gateways just don’t lend themselves well to this approach. When we saw how Zuplo worked and how clean it would be, it was a bit of a blessing.”

Imburse are also making heavy use of Zuplo’s native programmability — “I was able to put together prototypes of custom policies and custom rate-limiting algorithms and test them in literally minutes.” notes Andrew. “We actually have three levels of rate-limiting now - a custom rate limiter for users who are coming in through an authenticated flow where we can identify the organization that they work for. A fallback for a different type of authenticated user, and then we have another fallback for IP-based rate limiting. So even our anonymous methods are being rate limited now.”

They also care deeply about observability, and it was important that their chosen solution would work well with their preferred observability platform — Datadog.

“We wanted a holistic view of our estate, and we didn’t have that before Zuplo. if we wanted to look at calls coming into different parts of the system, we would have to go into individual services and go query those individually. By sort of introducing Zuplo and adding in the Datadog plugin, we were then able to create views that showed us all requests across all APIs in one view, which was really powerful. Really important. It allows us to very quickly pinpoint errors and spot problems as they're happening. It also allows us to get insights into some of the API design decisions that have been made over the years. So we're sort of starting to see patterns that we maybe wouldn't have spotted before”, notes Andrew,”It has really helped me in my role as a Site Reliability Engineer - given me lots to focus on!”

“Zuplo has really delivered. We’re an API-first company, and it's absolutely vital that our customers understand how our product works. They have to have a clear understanding of the APIs, they have to have confidence that what our documentation says those APIs do and how they work is actually how they work. So the fact we're able to tie our documentation, our specifications, and how we do deployment all together means that we can really nail that consistency. We have great performance. We have great observability. It fits with our platform.”

Check out the video interview with James and Andrew:

· One min read
Josh Twist

In January, we launched supbasejwt.com - announcement here to help you quickly create JWT tokens for your Supabase backend, because, you know - sometimes you just really want a JWT token.

Having quick and easy access to JWT tokens is super useful when testing your API or using an API Gateway like Zuplo.

Today, we're announcing firebasejwt.com - because sometimes you just want to get a JWT token.

It's easy to use and the instructions are on the homepage. Also, check out this video for a quick guide.

It's open source too - contribute on github

· 4 min read
Nate Totten

Recently, we shipped two new policies that make it easy to use Zuplo to utilize Firebase services. The first policy Upstream Firebase Admin Auth authorizes requests using a Firebase Admin Token that can be used to call any Firebase API. The second policy, Upstream Firebase User Auth authorizes requests as a specific user which allows securing Firebase resources using security rules.

It's common for multi-tenant systems to share the same database with many users. With Firestore, there are several ways to do this - one is create security rules that grant users access to certain collections, documents, etc., the other is to put another system in front of Firestore to gate access to data. In this walkthrough you will learn how to use Zuplo to expose data stored in Firebase securely without utilizing Firebase's security rules. This can be useful if you don't want to tie your system to Firebase rules or maybe you just need additional flexibility.

This post walks through the steps, but if you'd prefer you can also watch the demo video.

1/ Firestore Collection

For this walkthrough, we'll assume your Firebase database has a collection called products with at least one document.

Firestore Collection

2/ Create a Zuplo Route

In the Zuplo Portal, create a route in Zuplo that uses a URL Rewrite handler to map the incoming request to Firestore's REST API. In this case set the Route's url to /products/{id} and the rewrite value to the value below. Replace YOUR_PROJECT_ID with your Firebase project ID.

https://firestore.googleapis.com/v1/projects/YOUR_PROJECT_ID/databases/(default)/documents/products/${params.id}

Products Route

3/ Firebase Authentication Policy

Next, to give the request access to call the Firestore REST API, add the Upstream Firebase Admin Auth policy. Notice the environment variable named SERVICE_ACCOUNT_JSON. We'll set this variable in the next step.

Add Policy

4/ Environment Variable

Next, set the SERVICE_ACCOUNT_JSON environment variable as a secret. To get the value of the private key, navigate to Firebase Project Settings, select the Service Accounts tab and then generate and download a private key.

CAUTION: The value of the private key is a JSON file. Before you save the file to Zuplo's environment variables, you must remove all line breaks and all instances of the \n escape character. The JSON file should be a single line.

Environment Variable

5/ Test the Route

Next, return the file explorer in Zuplo and select the route you created earlier. Click the Test button. Set the ID pramaeter in the path /products/{id} to an ID in your Firebase collection. Click Test and you should see the data from the product returned.

Test Result

6/ Modify the Body

The response returned from Firestore isn't in the nicest format. Add a new custom policy to the route by selecting Add Policy and searching for custom code outbound. Set the configuration of the policy to the code below and click Save.

{
"export": "default",
"module": "$import(./modules/rewrite-body)"
}

Next create a new outbound module called rewrite-body.ts and set it to the following code. This will take the JSON sent by Firestore and convert it into a more readable format.

export default async function (response: Response) {
// Read the outgoing body
const body = await response.json();

// Create a new body with additional properties
const outbound = {
name: body.fields.name.stringValue,
description: body.fields.description.stringValue,
price: body.fields.price.stringValue,
};

// Return a new request with the modified body
return new Response(JSON.stringify(outbound), response);
}

7/ Test the Body Rewrite

Go back to the route tester and fetch the document again. This time you will get a response with a nicely formatted JSON document like the below example.

{
"name": "Widget",
"description": "The best widget you have ever used.",
"price": "99.99"
}

Now you have a document that is stored in Firebase Firestore that can be served to users through a nice REST API. I addition to what was shown in this walkthrough, its easy to add even more functionality like authentication with API Keys, rate limiting, and more using Zuplo.

· 2 min read
Josh Twist

Today we're excited to announce one of the first cool features resulting from Zuplo's bet on the OpenAPI standard: rapid mocking of APIs using examples inside an OpenAPI document - it's just what every

Sometimes it's better to show than tell, so in that spirit, check out the 2 minute video below that shows you the end-to-end experience.

With this powerful new capability, developers can effortlessly generate mock endpoints that mimic the behavior of real APIs, speeding up development cycles and enabling more efficient testing. Combined with our sleep policy you can even mix in some latency for added realism - just what every mockstar frontend developer needs!

Walkthrough

To get started, create a new project in Zuplo at portal.zuplo.com (or use an existing project if you have one). Hopefully you have an OpenAPI document (or you can get ChatGPT to generate one for you) with some juicy examples in it - I'm going to use the Postman OpenAPI doc from apis.guru.

Let's import your OpenAPI doc.

Import OpenAPI

Don't forget to save your changes (CMD+S). Not all routes in this OpenAPI doc have examples but the route named Single API does, so lets use that one.

Single API

Select that route and expand the policies window. Click Add Policy to the request pipeline and search for Mock. You should find the new Mock API policy.

Mock API Policy

Accept the defaults and click OK. Save your changes (CMD+S).

Click the Test button next to the path field and click the URL to open the API response in your browser:

Test URL

And boom 💥 you just mocked some of the postman API. Sign up for a free account at portal.zuplo.com and enjoy!

Also, check out the video below for a more detailed walkthrough.

· 3 min read
Josh Twist

I recently had the pleasure of chatting with Ben Garvey, the co-founder and CTO of Common Paper. Our discussion covers their innovative open-source platform for contracts and how they are revolutionizing the way businesses handle contract management and how they used Zuplo to accelerate the launch of their API.

Unleashing the Power of Open Source for Contracts

In the chat (video below) Ben explains that Common Paper is on a mission to simplify and accelerate the contract creation and negotiation process. Their platform offers a comprehensive range of standard agreements that can be easily downloaded from their website. From NDAs to CSAs, DPAs to partnership agreements, Common Paper provides a vast library of open-source contracts. This approach draws inspiration from the world of open-source software, where licenses like Apache 2 and GPL are readily available for developers without the need for legal consultation.

By leveraging Common Paper's platform, startups and businesses can say goodbye to the archaic practice of emailing Word documents back and forth during the contract negotiation phase. Instead, the platform enables users to create, negotiate, and sign contracts directly within the app. This streamlined workflow not only saves time but also reduces costs, empowering sales teams to close deals faster.

Deploying Zuplo to focus on what matters and move fast

During our conversation, Ben highlights the benefits of Zuplo - acting as a gateway for Common Paper's API, with essential capabilities including API authentication, rate limiting and developer documentation. With a small team at Common Paper, leveraging Zuplo allowed their engineers to focus on product development, leaving the complex aspects of API management to the experts.

One interesting aspect of Common Paper's integration with Zuplo is the generation of API keys being embedded into their own dashboard. By utilizing Zuplo's API key service, Common Paper simplifies the process of managing and securing their API keys.

Ben notes the excellent service he has received from the team at Zuplo and is a particular fan of how fast Zuplo is - particularly our near instantaneous deployment time; aligning with Common Paper's need for quick iteration and shipping fast. The combination of Zuplo's reliable infrastructure, extensive documentation, and responsive support made it an ideal choice for Common Paper's API management requirements.

If you're looking to simplify your contract management checkout Common Paper, and if you're interested in accelerating the launch and simplifying the operations of your API - try Zuplo for free at portal.zuplo.com

· 6 min read
Nate Totten

If your business provides and API to your customers and partners (which it almost always should!) it is important to build your API in a way that helps developers be successful. While there are many elements to API design, this post will discuss the choice between GraphQL and REST. GraphQL is often an excellent choice for internal APIs but might not always be the right fit for customer-facing or partner APIs due to its complexity. This post will discuss some of the tradeoffs between GraphQL and REST as well as offer some ideas on how this doesn’t have to be an OR decision, but rather how you can relatively easily support both GraphQL and REST.

GraphQL: Powerful and Complex

GraphQL, a query language for APIs, was developed by Facebook in 2012 to address the limitations of traditional REST APIs. A GraphQL API can make your frontend more performant by allowing fine-grain queries that allow fetching exactly the data needed for your app. This makes a lot of sense for certain apps (especially super complex one’s like Facebook). Some additional benefits of GraphQL are:

  1. Flexibility: GraphQL allows clients to request the exact data they need, without over-fetching or under-fetching. This enables faster and more efficient communication between services.
  2. Strong Typing: GraphQL's type system enables API developers to define the types of data that can be requested, making it easier to maintain and debug applications.
  3. Schema Introspection: GraphQL provides built-in tools for exploring and understanding the API, making it easier for developers to work with and build upon.

Despite its numerous benefits, GraphQL's complexity can be a challenge when it comes to external APIs shared with customers or partners. Here's why:

  1. Steeper Learning Curve: GraphQL's query language and type system can be daunting for developers who are new to the technology. This can lead to increased onboarding time and difficulty when it comes to integrating with external systems.
  2. Security Concerns: GraphQL's flexibility can also lead to potential security issues, such as exposing sensitive data or allowing clients to perform costly operations that could impact server performance. This requires careful implementation of access controls and query validation.
  3. Resource Intensive: The flexibility of GraphQL means that queries can becoming extremely complex and taxing on your backend. For example, a request might end up requesting data from multiple tables in your database over a large timespan. You must be extremely careful when implementing your API to ensure customers are generating queries that tax your systems.

REST: A Simpler Choice for External APIs

Considering the challenges posed by GraphQL's complexity, REST is often a better choice for APIs shared with customers or partners. Here's why:

  1. Simplicity: REST is based on standard HTTP verbs (GET, POST, PUT, DELETE) and status codes, making it intuitive and easy to use for developers who are already familiar with HTTP.
  2. Compatibility: REST APIs can be easily consumed by various clients, including web browsers, mobile apps, and other servers, without the need for specialized libraries or tools.
  3. Caching: REST APIs support built-in HTTP caching mechanisms that are easy to implement and will improve performance and reduces server load.
  4. Mature Ecosystem: REST has been the dominant API design style for years, resulting in a mature ecosystem with extensive documentation, tooling, and libraries. Everybody developer, on any platform, with any language can use a REST API.

Making the Choice (or not)

So say you really want to use GraphQL (or maybe you already built a GraphQL API), but now you want to share your API with customers or partners. For the vast majority of scenarios, REST is a better choice for an external API. Developers will onboard faster, you will spend less time supporting your external API program - it’s just easier. Fortunately, you don’t have to choose. There a several great libraries out there that make it easy to proxy a REST API to a GraphQL backend.

One such library is called SOFA. This is a Javascript library that is compatible with Node, Deno, and standard fetch APIs. It doesn’t have a dependency on any specific framework so it can basically be plugged into any web server.

Building a REST to GraphQL Proxy

In this next section, we’ll explore how to build expose a GraphQL API with REST using SOFA and expressjs.

You can see the full source of this example on Github, but lets go through the important parts below. First, install create a new project and install the dependencies.

npm init -y
npm install express sofa-api @graphql-tools/schema

For this sample, we’ll use ESM modules so open your package.json and add the property "type": "module".

Next, create a index.mjs (make sure to use mjs for ESM) file with a simple express server. Add the sofa module to the /api route.

import { useSofa } from "sofa-api";
import { makeExecutableSchema } from "@graphql-tools/schema";
import express from "express";
import { resolvers } from "./resolvers.mjs";
import { typeDefs } from "./schema.mjs";

const app = express();

const schema = makeExecutableSchema({
typeDefs,
resolvers,
});

app.use(
"/api",
useSofa({
basePath: "/api",
schema,
})
);

app.listen(3000, () => {
console.log(`Example app listening on port 3000`);
});

Next, add your schema. There are several ways to do this, but to keep it simple here it will just be a string. Create the file schema.mjs and add the schema. The full file can be found in the example.

export const typeDefs = `
type Pizza {
dough: String!
toppings: [String!]
}

type Salad {
ingredients: [String!]!
}
...
`;

Finally, create a mock resolver in resolver.mjs that just returns data from fixed collections. In a real app this would be your GraphQL resolver.

export const resolvers = {
Query: {
me() {
return UsersCollection.get(1);
},
user(_, { id }) {
return UsersCollection.get(id);
},
...
}
}

Run npm start in the project directory and query the server. Try navigating to https://localhost:3000/api/users or using your favorite API client to fetch the list of users.

REST API users response

Wrapping Up

While GraphQL is a powerful and flexible choice for building internal APIs, its complexity can make it less suitable for customer-facing or partner APIs. REST, with its simplicity and ease of use, is often a better choice for external APIs. Ultimately, the decision between GraphQL and REST should be based on your specific use case, the needs of your developers, and the requirements of your customers or partners. Or if you find yourself in a position of not wanting to choose, you can use a few great open source libraries to expose your existing GraphQL API to your external users as a REST API.

· 5 min read
Josh Twist

Over the past few years, the field of natural language processing has seen rapid advancements, with GPT-based models like Chat-GPT leading the charge. It's an exciting time with massive productivity gains ahead, especially for software engineers.

One area of software development that is going to grow exponentially important in a world boosted by AI productivity is APIs. APIs are how AI will actually get things done and interact with real-world services.

Proof of this came recently with the announcement of Chat-GPT plugins. This is a way for OpenAI to connect with real-world services via APIs. And, amazingly, all OpenAI need to understand how your API works in an OpenAPI document. Wow, we knew OpenAPI (so confusing, the similarity in names) was going to be important but...

As a company that is all about APIs all the time, we couldn't be more excited. We're the only gateway natively powered by OpenAPI which makes us the fastest way to deploy a Chat-GPT plugin. In this post, I'll show you how (also available in video)

For the purposes of this demo, we'll use a simple example API

1/ Installing a plugin to Chat-GPT

First, you need access to the Chat-GPT plugin which is currently in alpha. I found it hard to learn how to do this so I'll share in detail here - but you will need access.

Login to Chat-GPT at chat.openai.com and make sure you have the Plugins option selected

Chat GPT Plugin

Then, to add your own plugin, go to the plugin store

Plugin Store

In the plugin store, choose Develop your own plugin at the bottom

Develop your own plugin

This will open a prompt, asking for your domain - where OpenAI will find your manifest file.

Enter URL

The manifest file is a document that tells OpenAI more about your API and where it will find your OpenAPI document. It has to be at the same location on your domain https://example.com/.well-known/ai-plugin.json. With Zuplo, we can easily create and host a manifest - let's switch over to Zuplo and get everything ready, including our manifest and OpenAPI document.

2/ Creating the manifest file

Create a free account on Zuplo at portal.zuplo.com and create a new project. In your project - we'll need to add our first route for the manifest.

Click on routes.oas.json to select your routes file (this is actually an OpenAPI file under the hood) and click Add route.

Set the following properties on your new route

  • Summary: OpenAI Manifest File
  • Path: /.well-known/ai-plugin.json

And press CMD+S to save your changes. Next, we'll need to make the handler for this route a custom function. In the Request Handler section, choose Function and use the ellipsis ... to create a new Module called manifest.

Create manifest.ts

This will open your new manifest.ts file in the editor. Paste the following code, replacing the original template:

import { ZuploContext, ZuploRequest } from "@zuplo/runtime";

const manifest = {
schema_version: "v1",
name_for_human: "Pro Club Tennis",
name_for_model: "pro_club_tennis_score",
description_for_human:
"Plugin getting the current players and score for Tennis on our 6 courts",
description_for_model:
"Plugin getting the current players and score for Tennis on our 6 courts",
auth: {
type: "none",
},
api: {
type: "openapi",
url: "/openapi",
is_user_authenticated: false,
},
logo_url:
"https://thumbs.dreamstime.com/z/pickleball-logo-combination-lettering-moving-261404902.jpg",
contact_email: "support@example.com",
legal_info_url: "https://example.com/legal",
};

export default async function (request: ZuploRequest, context: ZuploContext) {
// Zuplo will automatically serialize to JSON and add the content-type header
// if you return an object like this in a function.
return manifest;
}

A few things to note about this manifest, we are not using any auth for our API - it's public (you can add auth protection with zuplo if you like). Also, note the relative link to our OpenAPI file at /openapi. That's the next route we'll add. Save your changes - your manifest file is now ready.

3/ Serving the OpenAPI file

Since our routes.oas.json file IS an OpenAPI file we just have to tell Zuplo that we'd like to serve it, and on what path.

Add a new Route and set the path to /openapi. Choose OpenAP Spec for your route handler, it should look like this:

OpenAPI route

This will now serve a sanitized (x-zuplo stuff and x-internal operations removed) from the path /openapi. Neat! The very routing table powering your gateway and documentation is now available as an endpoint (and visible to OpenAI).

4/ The actual API part

If you have an OpenAPI file for your API already, you can just import to Zuplo and most likely you are off to the races. To do this, go to the OpenAPI tab and hit Import OpenAPI.

Import OpenAPI

Your routes should have been imported and you should be good to go.

If you don't have an API with OpenAPI handy, you can easily use Zuplo to create one. Watch this video to see how I created the demo API using Zuplo + ChatGPT in under 5 minutes.

5/ Setup the ChatGPT plugin

Now it's time to go back to chat GPT to setup the plugin, but before we do go the Getting Started page to get your gateways URL.

Getting started in zuplo

Use the copy button next to your gateway's URL ("Your API gateway is live at").

Now head back to ChatGPT and paste the URL into that dialog asking for your domain

Enter your domain

And click Find manifest file.

With a bit of luck, you'll see the next 'Found Plugin' screen with no errors. Otherwise errors in your manifest are typically well explained and easy to correct.

Found plugin

If so, click Install for me and keep going through the many dialogs until you see your plugin in the chat gpt main screen. Then ask, 'What are the scores on court 3?'

Et voila! A working plugin

Working plugin

Checkout the video version of this content: