
· 10 min read
Josh Twist

In 'The three pillars of an API program' we outline that one of the critical pillars of launching an API is protection - or, more specifically, rate limiting.

API rate limiting is a technique used to control the number of requests that can be made to an API within a specified time frame. This helps maintain the stability and performance of the API by preventing server overload, protecting against DDoS attacks, and ensuring fair usage among consumers. Additionally, many businesses use rate limits as a product feature (e.g. premium customers get higher rate limits than free, for example - see Twitter).

There are infinite articles about different rate limiting algorithms - token bucket vs sliding window, yada yada. Mostly these articles are more interesting academically than they are practical; there are more pressing concerns that must be closed before thinking about the nuances of different algorithms.

That’s why we’ve put this guide together for you, based on our experiences working with many customers on rate-limiting challenges at zuplo, including building a high-performance distributed rate-limiting capability. How distributed? Try 1000s of instances per customer running in 250+ data centers around the world.

This article is also available in video

We’ll cover

  • a canonical rate-limiting implementation for an HTTP API
  • secret limits or public?
  • how should rate limiting be applied? globally, by IP, user, or custom functions?
  • rate-limiting in distributed systems
  • the latency/accuracy tradeoff
  • observability - what do I need?
  • how do I configure my rate limits in the first place?

This article explores these items from the viewpoint of the API owner and how to offer the best experience for your API consumers.

A canonical approach to rate-limiting for an HTTP API

This part is relatively simple but is often done incorrectly. We recommend returning a 429 status code which is described on MDN as “indicates the user has sent too many requests in a given amount of time (’rate limiting’)” - so perfect.

We recommend using the Problem Details format as the body of your response. For example:

{
"type": "https://httpproblems.com/http-status/429",
"title": "Too Many Requests",
"detail": "You made too many requests to the endpoint, try again later",
"instance": "/account/12345/msgs/abc",
"trace": {
"requestId": "4d54e4ee-c003-4d75-aba9-e09a6d707b08"
}
}

Depending on the decision you make in the next section, you might choose to include a Retry-After header with the number of seconds the user should wait before trying again.

Retry-After: 3600

Do you keep limit thresholds and timings a secret?

Some rate-limiting implementations return information to the user that tells them how long they should wait until trying their request again. This can be very useful but also presents some risk. If a malicious user is effectively trying to maximize the amount of resources they can consume without hitting the rate limit, they can use this information to infer your rate-limiting policy. For this reason, many businesses choose not to disclose this and keep rate-limit thresholds and timings private. This is common for public, anonymous APIs but also for APIs that require authentication, but it’s easy to get an access key. For example, a free tier of a service where I can use an e-mail address to get access to the API. The gate to entry isn’t effortless, but it isn’t hard either.

However, if you have a more formal arrangement with your API consumer; maybe they are a paying customer, then it is often better to share details of the rate limits you’re imposing on them. So we find most B2B APIs that require a contract are liberal in disclosing their rate-limits, while free APIs keep their cards closer to their chest. Based on this, you may choose not to share a Retry-After header (and we made this an easy option in the Zuplo rate limiting policy).

You may even choose to have a variable policy - where your free customers don’t get a header, but your paying customers do.

How to apply rate limiting (AKA why IP or global rate limiting is a bad idea)

So you’ve been convinced that you need to think about rate-limiting protection 👏 - the next step is to think about how to apply that rate limit.

The most obvious approach might be to apply a global rate limit to all incoming requests. That will help make sure your backend doesn’t go down. But remember your goals, you want to protect your resources and ensure a great customer experience by not allowing one customer to impact others (by taking you down or abusing their API access).

It may still be valuable to have a global rate limit, but you will need something more fine-grained to prevent any noisy neighbor issues. At this point, folks might reach for IP-based rate-limiting. However, in some scenarios, this can actually increase the chance that one customer negatively impacts the experience of another.

data-center.png

web-work.png

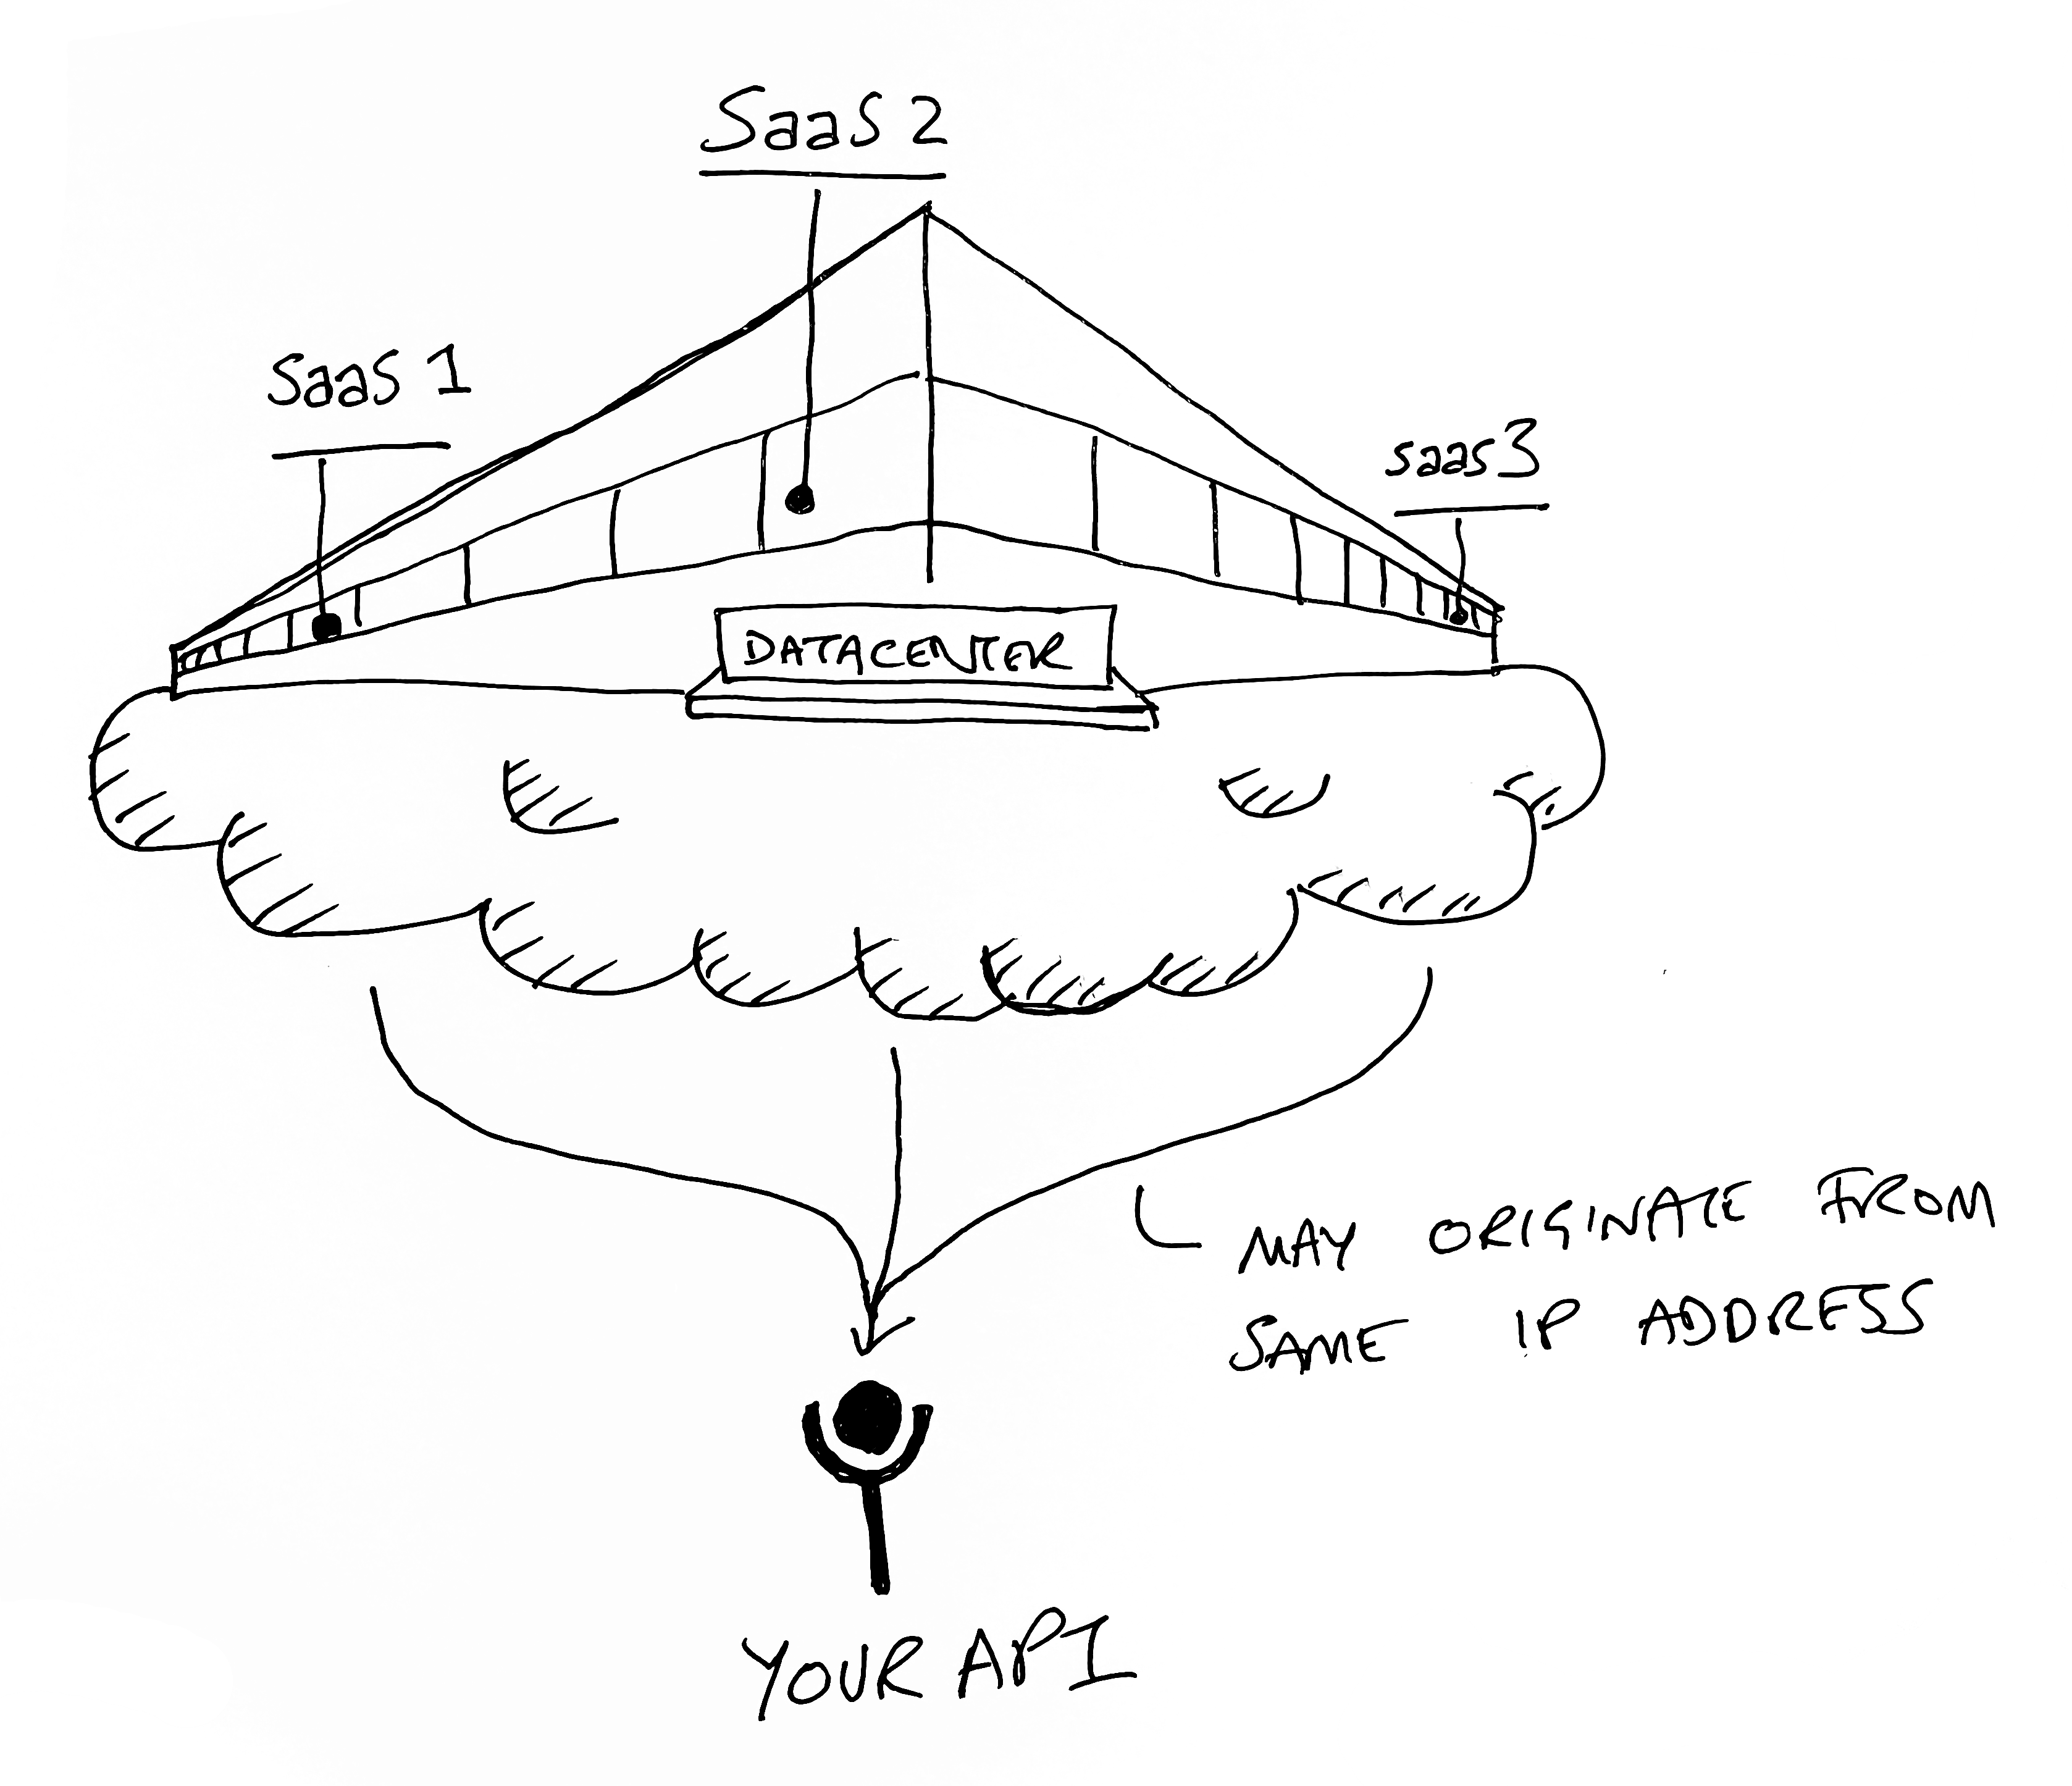
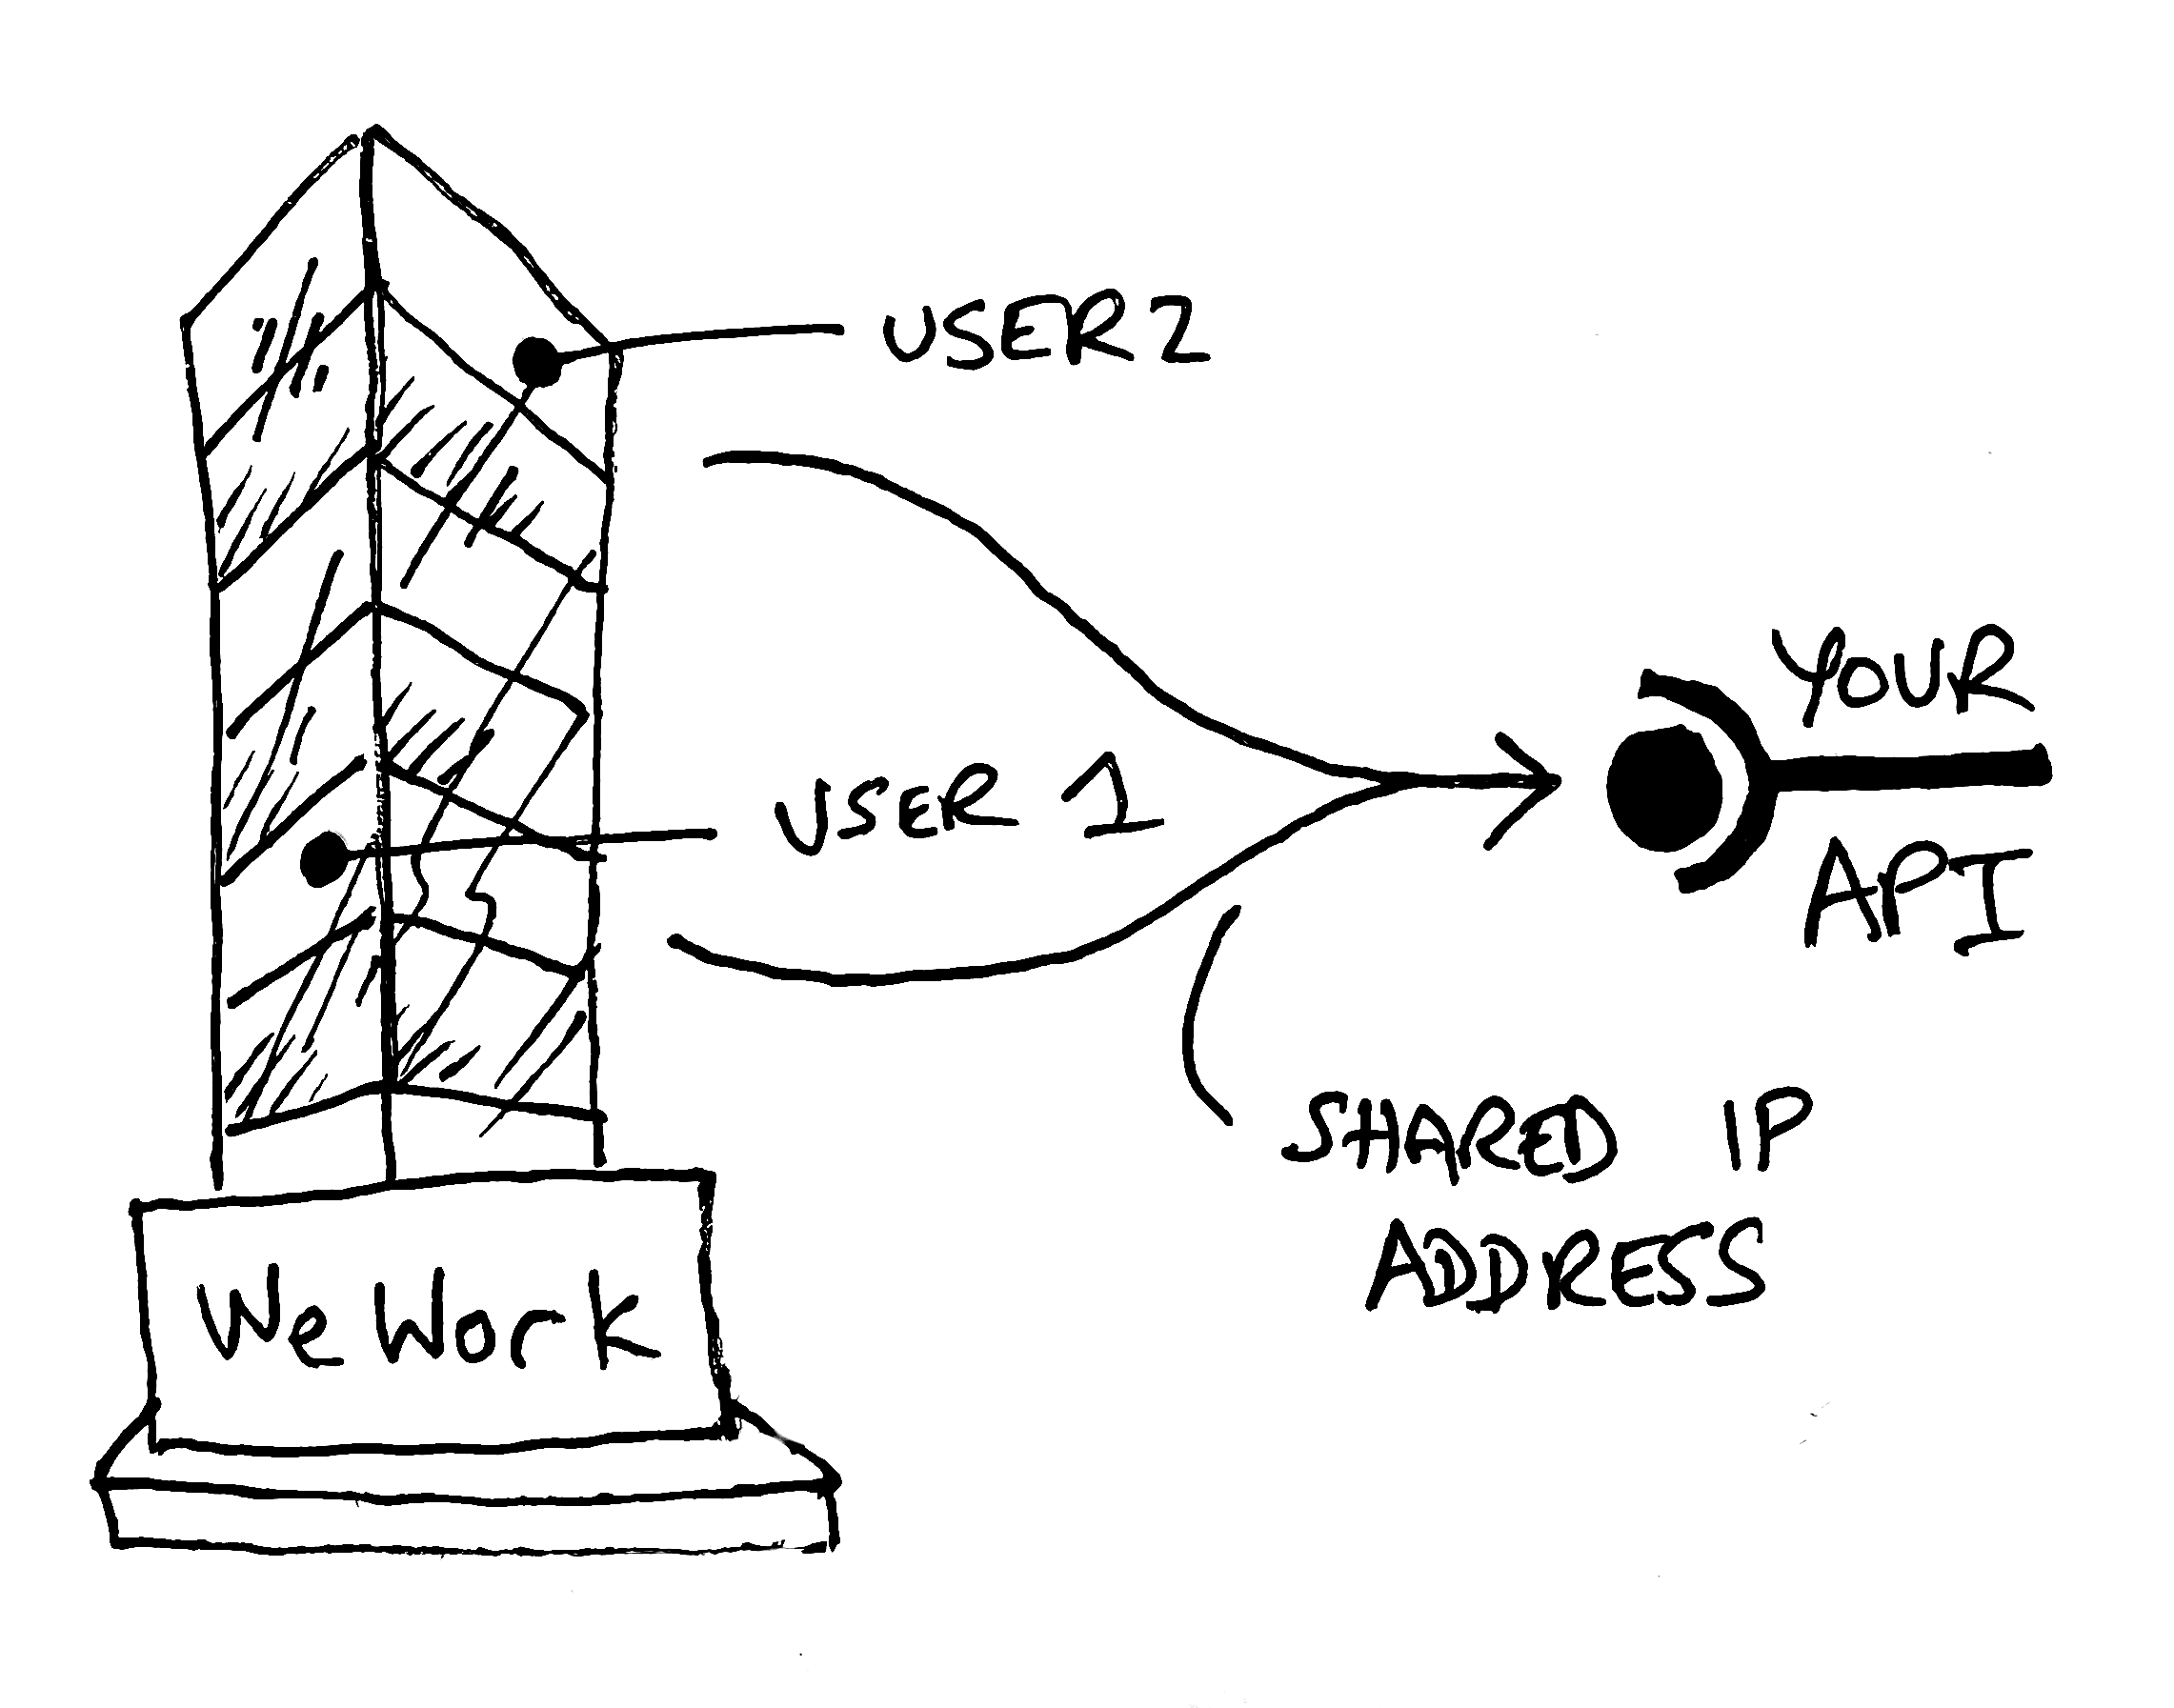
If you have two API consumers hosting at a major cloud provider, it’s possible their outbound calls share an IP address. For individual users calling your API from their device, they might be co-working in a WeWork and sharing WiFi, and most likely an IP address. In these cases, rate-limiting by IP can actually create a noisy neighbor problem, as one customer causes the other to be blocked when they hit your rate limit. This is surprisingly common.

The best approach is to rate limit by the user, typically leveraging an authentication mechanism like a JWT or API Key. This is the fairest approach. In Zuplo, when we do user rate-limiting, we unpack the JWT (or API key) and extract the sub or ‘subject’. So even if the same user has two JWTs, they’ll both count toward the same rate limit total.

The most advanced approach allows you to segment users into different buckets. For example, maybe free users get 10 RPS (requests per second), while premium users get 1M RPS. A good example of somebody who does this is GitHub - they even allow unauthenticated access to their API, but it is tightly throttled.

This is user-specific rate-limiting (we call it dynamic rate-limiting in Zuplo).

Rate-limiting in distributed systems

Implementing a rate-limit algorithm or using an open-source package is relatively trivial if you have a simple setup with a single server (or process) handling the rate-limit counting. You can probably just keep the count of requests in memory for maximum performance and the lowest latency. However, the minute you scale up your system (for high availability or higher load), you have a whole new set of problems.

servers.png

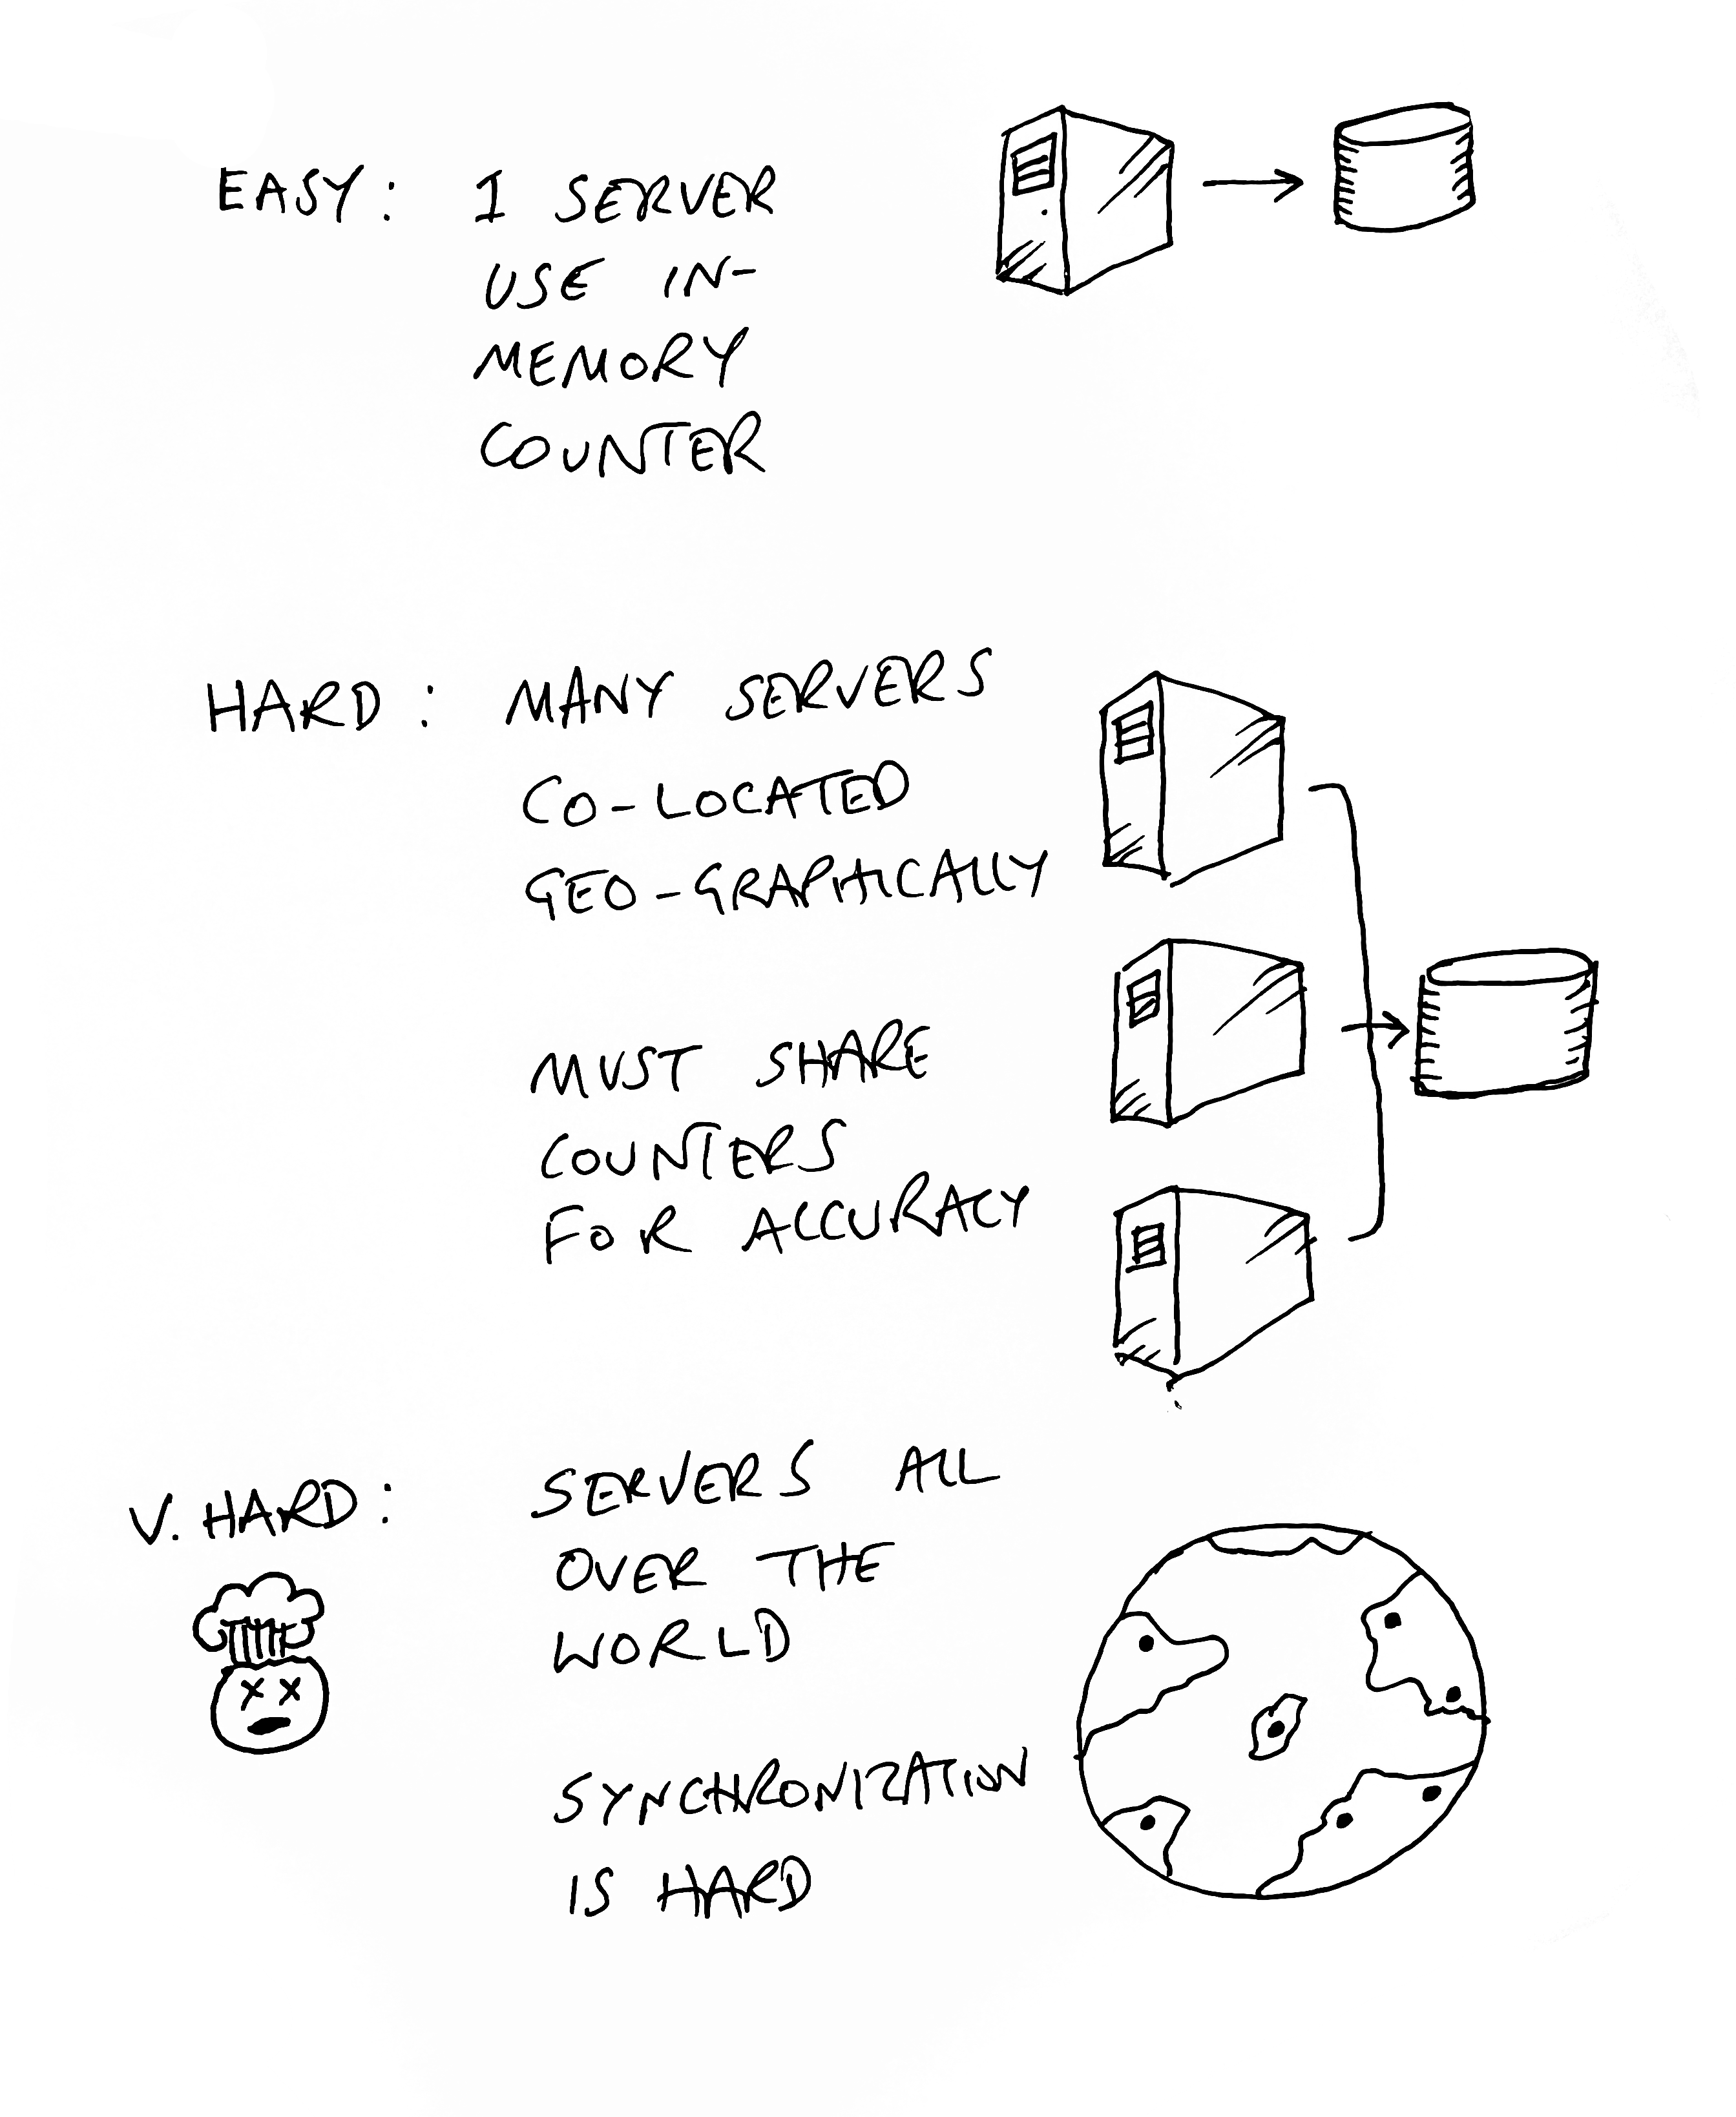
You cannot use an in-process counter because your load balancer might send the next request for a given user to a different machine, allowing them to exceed the rate-limit many-fold (by as many machines/processes as you have). One way around this is to have a sticky session, so all traffic from a given identity goes to the same server. Building stateful services like this is generally a terrible idea, and rate-limiting is no longer your most pressing concern. Go fix that, then come back.

So most folks will need to think about an independent service to synchronize counts. Many folks use Redis for this. The problem now is that you are adding latency - often a meaningful amount - to your API.

rate-limit-latency.png

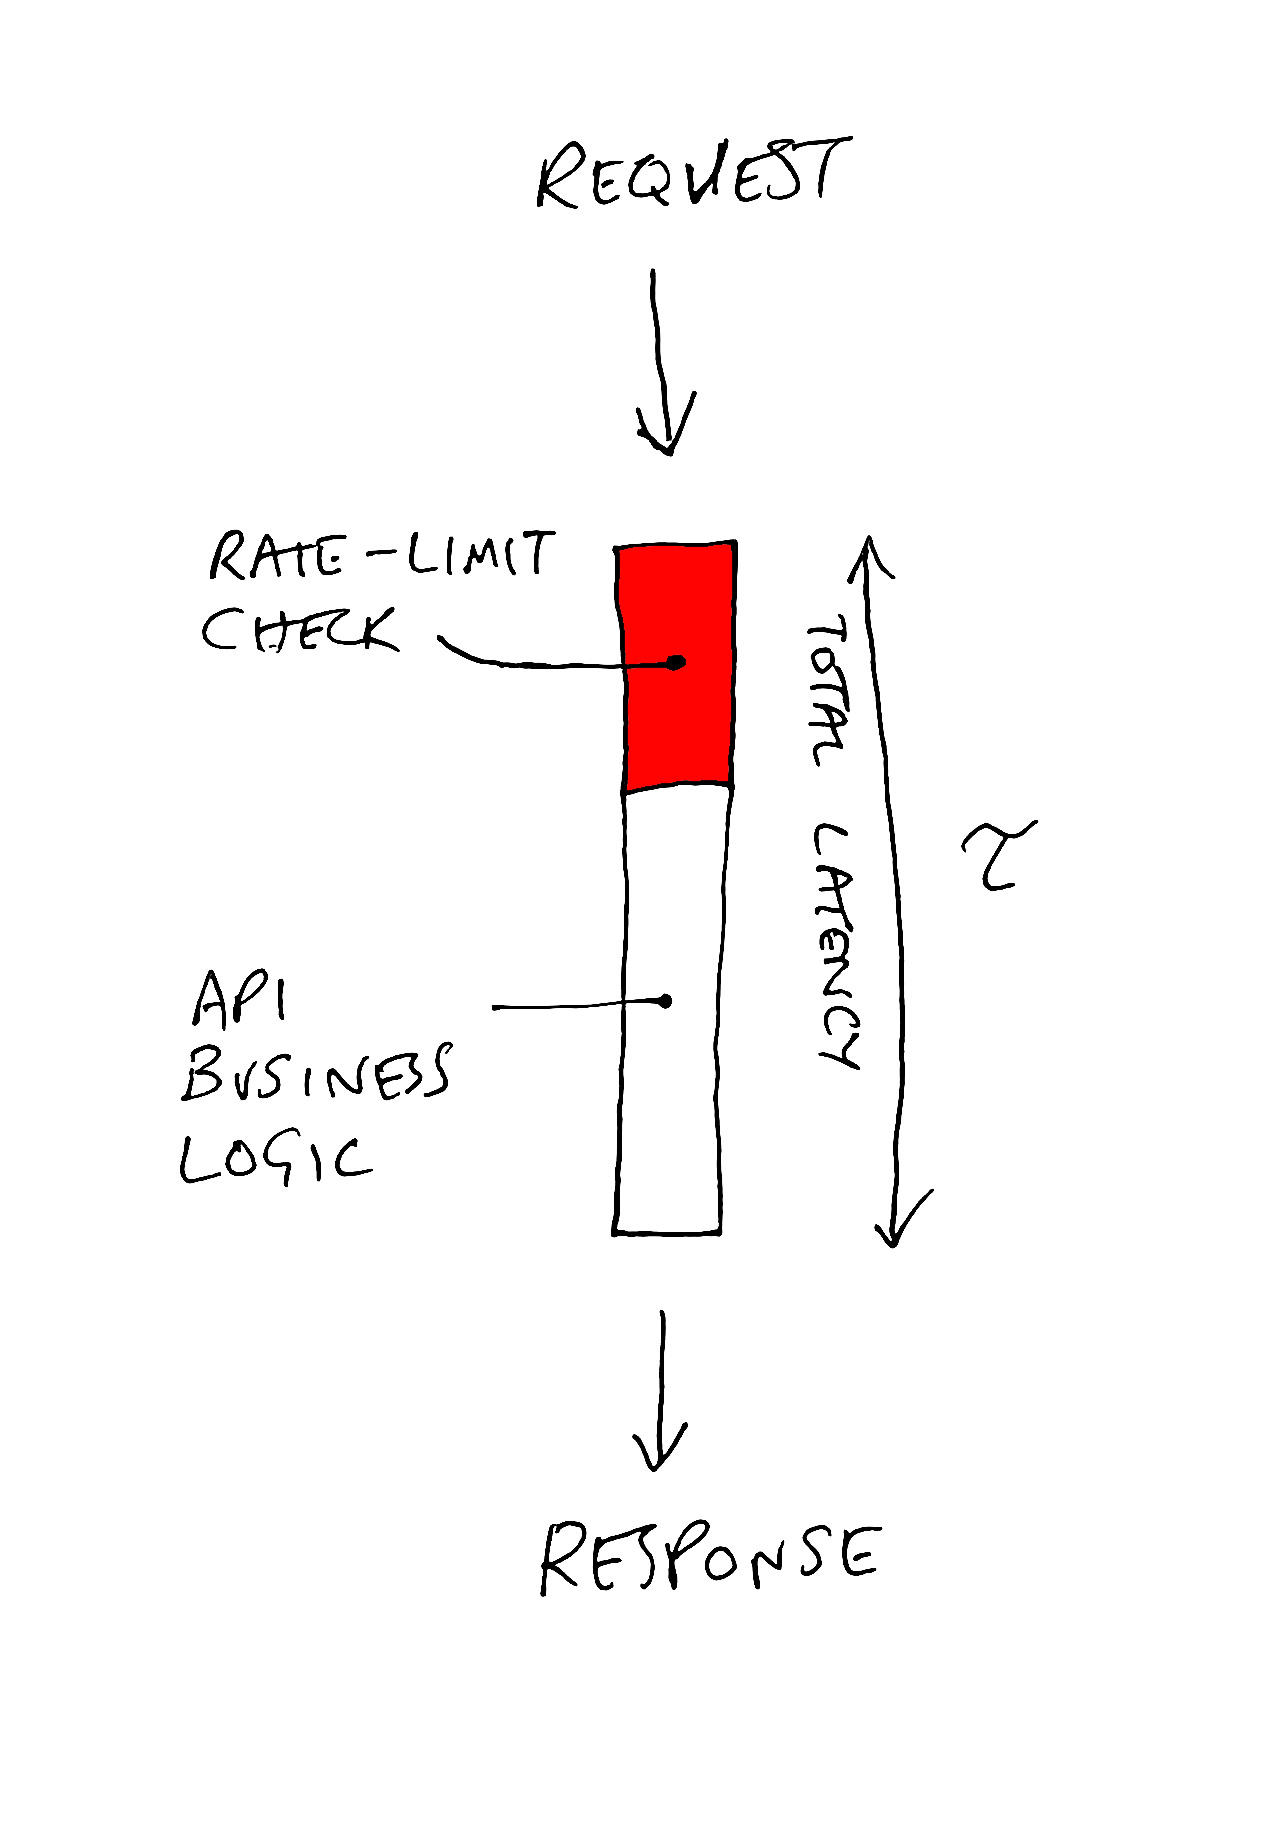
This becomes a particular problem if your service is highly distributed (or edge-based, like Zuplo) and in many data centers around the world. Do you have a single Redis instance in one location? That will add huge latency for folks calling servers far away from that location. The correct answer is to have multiple services around the world with some form of synchronization. This is non-trivial to setup, deploy and manage — but it is the world we live in today as developers.

At Zuplo we’ve spent a lot of time optimizing that latency with layers of caches and advanced replication. We call this strict mode, and when configured, we will not call the backend (API) until we know for sure this user is not rate-limited. However, we also have an async mode if you would prefer a different tradeoff…

The latency/accuracy tradeoff

In the design above, we are trading away performance (latency) in favor of accuracy. For many businesses, this might not be the right decision. Every call to your API will have added latency even though your API consumer has done nothing wrong. Instead, you may choose a design that gives the user the benefit of the doubt and allows the request to run in parallel with the rate limit check.

In Zuplo, we call this async mode.

We implement a local cache (a datacenter-level cache, in-memory cache, or combination thereof). Now the latency added to each request is minimal. If the rate-limit check comes back negative the user will still get a 429 Too Many Requests (and we will update the local cache with an appropriate timeout to match the Retry-After).

async-mode.png

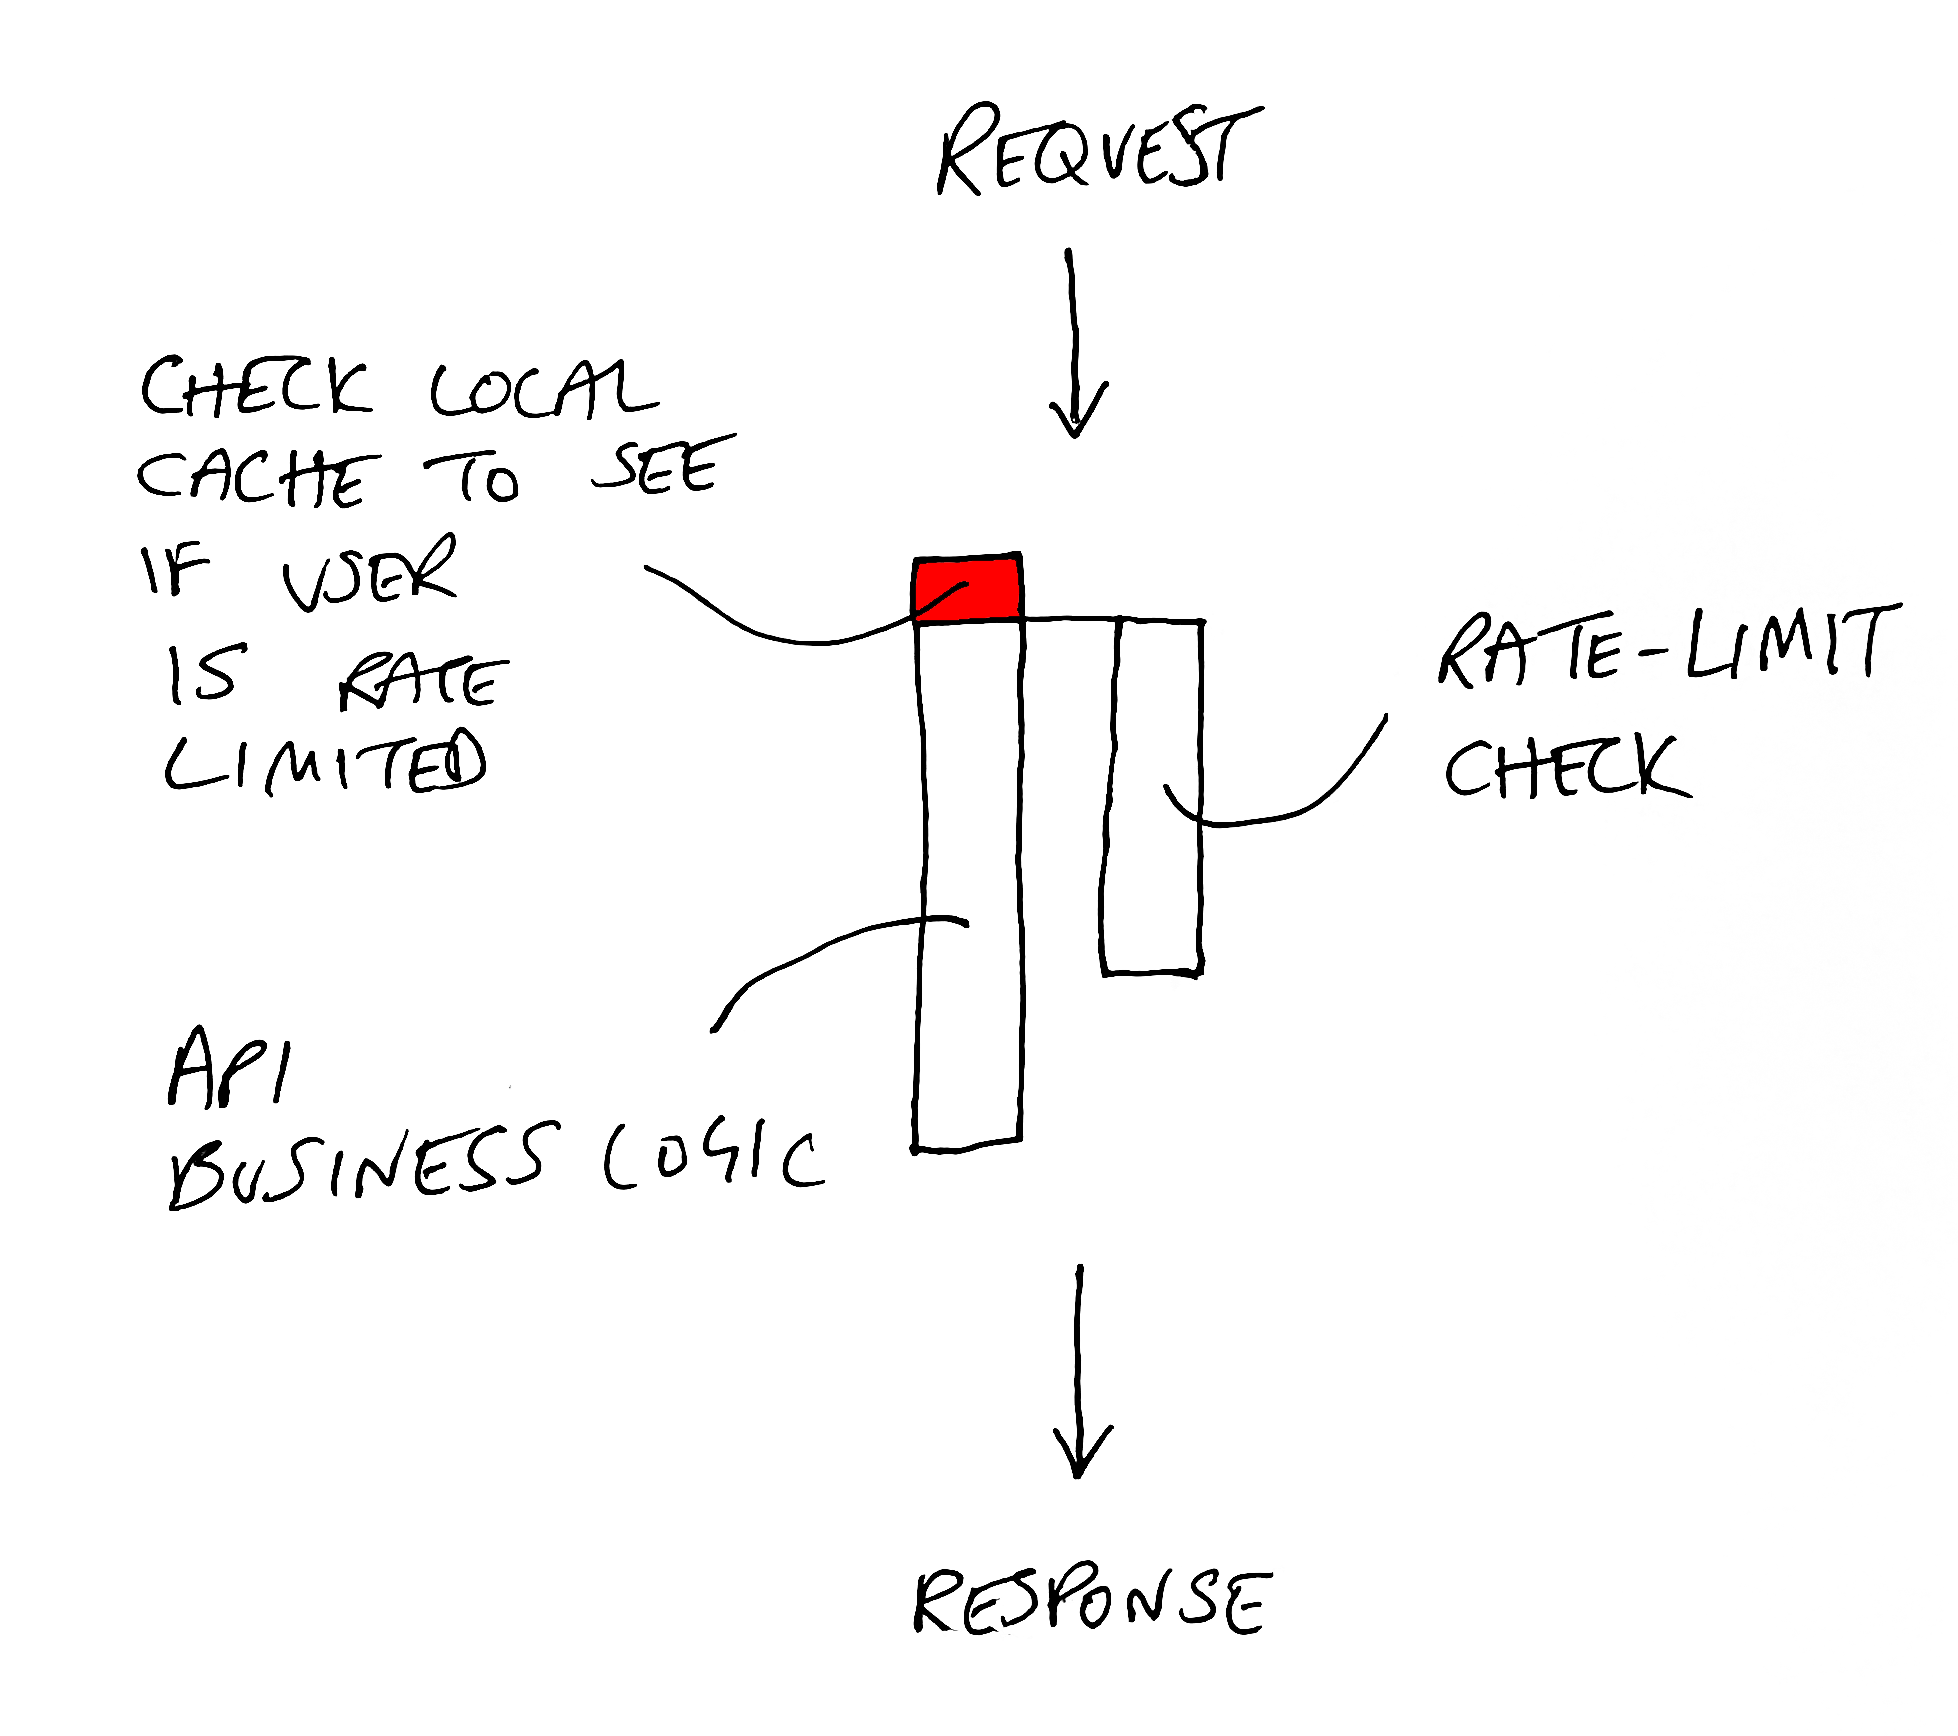
The downside to this approach is your backend may receive a little more traffic than was strictly defined. In most cases, this is probably the right call to offer the best experience for your API overall.

Observability - what’s the minimum you need

So far, we’ve only looked at how you might design and implement rate-limiting. We have not considered some of the important non-functional requirements like observability and analytics. Even better, how do you know where to set your rate limits?

A minimum bar for reporting on your rate-limiting includes

  • See a count of rate-limited responses
  • Being able to break this down by user (or IP, etc)

With these, you can identify users that are getting rate limited, how often, and reach out to them if necessary to discuss remediation (or punishment 😄).

To go further, it’s also good to be able to see the overall RPS (request per second) of your system and users as this will help with the next, and final section:

How do I configure my rate limits in the first place?

Setting rate limits is hard? How do you know when your system will break? Most businesses don’t get to stress test their system to the actual breaking point to set these limits, so the following approaches and heuristics can be helpful:

  1. Test-To-Failure Data - if you have had the benefit of a formal Test-To-Failure, then you should have some data on your max capacity and can use this to inform your rate limiting decisions. Maybe you didn’t proactively set this up but were unexpectedly tested in a real-world scenario. This data can be valuable to understand your breaking point. You might divide your overall capacity by your number of customers, plus some margin
  2. Observation before enforcement - before you enforce rate limiting, you can have a period of observation and look at the max RPS of your different customer profiles. You might then typically set the rate limits at some reasonable margin higher than that max, assuming that any meaningful spike beyond this is probably not intentional. Zuplo’s Rate Limiting and RPS reports can be useful for this.
  3. Business / Pricing - rate-limiting might be part of your overall business strategy, and you may charge customers for higher rate limits. In this case, conversations with your customers and prospects (combined with observation-before-enforcement) are usually a great source of input for how to set these rate limits.

Hopefully, you found this useful. As always, if you don’t want to build or manage any of this yourself, you can always turn to solutions like Zuplo that offer a fully managed, distributed, and programmable rate-limiting capability - try it for free at portal.zuplo.com.

· One min read
Josh Twist

· 3 min read
Josh Twist

I recently got to interview Tom Carden, Head of Engineering at Rewiring America, where he spoke about how they deployed Zuplo’s API Management platform to accelerate their API program.

Rewiring America, a nonprofit focused on electrifying homes, businesses, and communities in the US, required a solution for their IRA Savings Calculator API. “The IRA is the Inflation Reduction Act here in the US” explained Tom, “that puts a bunch of tax credits and rebates in the hands of everyday consumers to help them make a choice for cleaner, safer, and just plain better electric appliances in their home. Forty-two percent of US energy-related emissions come from our homes and we can dramatically reduce that by upgrading the machines we use daily.”

The initial calculator was built as a client-side app but then started receiving requests for an API so that folks could host the functionality on their own website.

Being an experienced Engineering Manager, Tom knew that there was a lot of potential “wheel reinvention” ahead to start a new API program — requiring API authentication, rate-limiting to prevent noisy neighbor problems and abuse, and developer documentation with integrated key management; we call these the three pillars of an API program.

Tom spent some time evaluating different off-the-shelf options before selecting Zuplo to help them get their API to market quicker. “I think I was originally evaluating Zuplo as a documentation host. But once I understood that it was a gateway that could deal with API key management, validation, rate limiting, and also had a long tail of programmable plugins; I was pretty much sold at that point but went off to do my due diligence on alternatives nonetheless.”

Zuplo helped Tom and his team move faster than the alternatives thanks to the focus on developer experience with real-time feedback (press save, and your changes are live to test) and offered a gitops integration with GitHub, meaning they could deploy multiple environments to the edge in seconds.

Tom also described the value of using Zuplo versus building a solution in-house, saving weeks of engineering time and avoiding ongoing maintenance costs. “We could bring this stuff in-house and get something good enough. But I look at that as opportunity costs, we're not solving the problems that are unique to our organization. We're spending time reinventing the wheel. So I'd rather buy.”

With Zuplo's help, Rewiring America can focus on its mission to help Americans upgrade the machines they depend on and avoid reinventing the wheel when it comes to offering a great developer experience to users of their API.

· 10 min read
Nate Totten

Good API design is intentional. You are building something that needs to be easy to use, maintainable, scalable, and robust.

This is the problem that OpenAPI helps solve. Instead of hacking an API together, OpenAPI lets you design within a specification and generate code from there. While OpenAPI definitely improves API design, documentation, and collaboration, it has a couple of challenges:

  • It has a steep learning curve. For developers new to OpenAPI, there can be a learning curve to understand the specification's syntax, structure, and best practices. This may require an initial investment of time and effort.
  • It’s verbose. OpenAPI specifications can become quite large and verbose, especially for complex APIs. This can make it difficult to manage, maintain, and understand the API design.

These issues lead to more errors in the specifications, which lead to more errors in the eventual endpoints. They also make OpenAPI specs difficult to grok for new developers, and difficult to reuse for even senior developers. Again, both of these issues lead to more errors.

Making API design easier, both in terms of learning and writing is the motivation behind Microsoft’s TypeSpec. TypeSpec is "a language for describing cloud service APIs and generating other API description languages, client and service code, documentation, and other assets."

Basically, it is TypeScript for APIs. Like TypeScript, TypeSpec allows you to explicitly define types for variables, function parameters, and return values, which helps catch type-related errors during compile time (you can compile your TypeSpec to OpenAPI, or REST, or gRPC, or graphQL). It also lets you take advantage of Improved tooling and editor support for better code intelligence, better code organization with interfaces, namespaces, and modules, and better error handling with defined error messages. It brings a more dev-focused approach to API design.

Let’s take a look at how TypeSpec works and some of the main challenges in API design it addresses.

The challenges with designing APIs

The fact that TypeSpec comes from Microsoft is not a coincidence. Across Azure, the teams are dealing with hundreds of endpoints for internal and external use, for dozens of services. They are constantly designing new APIs. Having a system that can be configurable and understandable across the organization is critical.

The usual way to deal with this is through guidelines and best practices. As the scale and complexity of APIs grow, it becomes increasingly important to establish and enforce guidelines and best practices for API design. This can include aspects such as naming conventions, error handling, versioning, and security.

But these are just guidelines. Ensuring that developers across different teams adhere to these guidelines is a huge challenge. Specs such as OpenAPI help with this, but they don’t encourage or enforce:

  • Reuse: As the number of API endpoints and resources increases, it can be challenging to identify and reuse common patterns, data structures, and functionalities. Ensuring that APIs follow consistent patterns and avoid duplicating functionality is crucial for maintainability, ease of use, and performance.
  • Modularity: APIs at scale should be designed to be modular, allowing components to be developed, tested, and maintained independently. This helps to avoid tight coupling between components and facilitates a more manageable codebase. Striking the right balance between modularity and simplicity can be challenging.
  • Consistency: Ensuring consistency across a large set of APIs is essential for usability and maintainability. This includes consistent naming conventions, data formats, and behaviors. As the number of API endpoints and developers working on them increases, maintaining consistency can become more difficult.

OpenAPI also doesn’t support multiple protocols. Designing APIs at scale may require support for multiple protocols, such as REST, GraphQL, gRPC, or WebSocket. There isn’t a paradigm for accommodating these different protocols while maintaining a consistent design and user experience can be challenging.

TypeSpec is a protocol-agnostic language for building API descriptions at scale. It applies learnings from programming languages to API design. It has:

  • A familiar syntax, being based on TypeScript
  • Tooling for intellisence and code completion
  • Templating for reuse
  • Extensibility to support any protocol.

Let’s work through an example to show some of these at work.

Using TypeSpec

Let’s build an OpenAPI specification via the TypeSpec language. We’ll build a toy API, emit an OpenAPI specification, and then show how you can start to modularize your API design for better consistency and easier reuse.

As TypeSpec is based on TypeScript, the install and initialization will look familiar to anyone that knows JS. First, we’ll use NPM to install our compiler:

npm install -g @typespec/compiler

Being a Microsoft product, you can also get nice extensions for Code and VScode:

tsp code install
tsp vs install

Once the compiler is installed, we want to initialize the first project:

tsp init

This will prompt you with a few questions. As you build your own projects, you should choose the setup that fits your needs. Here, we’re going to pick the Generic Rest API template, a project name, and the @typespec/openapi3 library.

Then you can install the dependencies:

tsp install

This will install some node packages (this is node and npm under the skin) and create three new files:

  • package.json. A package manifest defining your typespec project as a node package.
  • tspconfig.yaml. Your TypeSpec project configuration file to configure emitters, emitter options, compiler options, etc.
  • main.tsp. The TypeSpec entrypoint

With that done you can start creating your TypeSpec. If we look at main.tsp now we’ll see just the top import:

import "@typespec/rest";
import "@typespec/openapi3";

We’ll use the HTTP service example from the CADL playground to work through (CADL was the internal project name for this at Microsoft. If you are looking for more information on TypeSpec, be sure to search for CADL as well).

After the imports, the first line sets up the generic namespace we are using (TypeSpec.Http).

Then we use the @service decorator to specify the service definition. We use this to set the title of the service and the version. We then set the namespace for our specific service. Namespaces will let us group related types together for better organization and to prevent name conflicts:

//...

using TypeSpec.Http;
@service({
title: "Widget Service",
version: "1.0.0",
})
namespace DemoService;

When we’re setting up our namespace, we can add a couple of other decorators:

  • @server - the endpoint for the service
  • @doc - a human-readable definition of the service

With that done, we can define our first model. We do that with the model keyword followed by the name we want for that model.

We are now at the Types part of TypeSpec. In each model we can set the type expected for each parameter for that model:

  • id is expecting a string
  • Weight in expecting and integer
  • Color is expecting a string with two possible values, red or blue.

There is also a @path decorator before the id, meaning that this property is a path parameter:

//...

model Widget {
@path id: string;
weight: int32;
color: "red" | "blue";
}

When we’ve defined our models we can define our interface.

First we’ll define our @route for this particular endpoint. Then a @tag that we can use with OpenAPI or Swagger to group our paths.

Finally, we’ll define an interface object containing all our operations. Each operation is defined using a decorator, then has the parameters and the return type. So, for instance:

@get list(): Widget[] | Error;

Here, we’ll set this up for a regular REST operations:

// ...

@route("/widgets")
@tag("Widgets")
interface Widgets {
@get list(): Widget[] | Error;
@get read(@path id: string): Widget | Error;
@post create(...Widget): Widget | Error;
@patch update(...Widget): Widget | Error;
@delete delete(@path id: string): void | Error;
}

Finally, we want to define that Error that might be returned. This is a simple error, but you should use Problem Details.

// ...

@error
model Error {
code: int32;
message: string;
}

With the service, model, interface, and error defined we can compile into an OpenAPI specification:

tsp compile .

This will produce a new directory, tsp-output, and ‘emit’ an openapi.yaml file defining your API.

openapi: 3.0.0
info:
title: Widget Service
version: 1.0.0
tags:
- name: Widgets
paths:
/widgets:
get:
tags:
- Widgets
operationId: Widgets_list
parameters: []
responses:
"200":
description: The request has succeeded.
content:
application/json:
schema:
type: array
items:
$ref: "#/components/schemas/Widget"
x-typespec-name: Widget[]
default:
description: An unexpected error response.
content:
application/json:
schema:
$ref: "#/components/schemas/Error"
post:
tags:
- Widgets

Going through the entire spec, we can see how some of the elements in the TypeSpec have compiled to OpenAPI. Here’s our Widget model, with the properties and requirements:

Widget:
type: object
properties:
id:
type: string
weight:
type: integer
format: int32
color:
type: string
enum:
- red
- blue
x-typespec-name: red | blue
required:
- id
- weight
- color

Here’s is our error model:

Error:
type: object
properties:
code:
type: integer
format: int32
message:
type: string
required:
- code
- message

What if we want to add another endpoint? We can do the obvious thing, which would be to copy the Widgets model and interface and just change the names. But TypeSpec gives us another options for this–Templates

We’ll create a new file called library.tsp and add our interface and error into this file:

import "@typespec/http";

using TypeSpec.Http;

@error
model Error {
code: int32;
message: string;
}

interface ResourceInterface<T> {
@get list(): T[] | Error;
@get read(@path id: string): T | Error;
@post create(...T): T | Error;
@patch update(...T): T | Error;
@delete delete(@path id: string): void | Error;
}

We create a generic ResourceInterface that takes in TypeScript parameters (T). We can then use these in our main.tsp. We can import our library and then use our template ResourceInterface to create our model-specific interfaces:

import "@typespec/http";
import "./library.tsp";

using TypeSpec.Http;
@service({
title: "Widget Service",
version: "1.0.0",
})
namespace DemoService;

model Widget {
@path
id: string;
weight: int32;
color: "red" | "blue";
}

model Gadget {
@path id: string;
height: float32;
width: float32;
color: "green" | "yellow";
}

@route("/widgets")
@tag("Widgets")
interface Widgets extends ResourceInterface<Widget> {
}

@route("/gadgets")
@tag("Gadgets")
interface Gadgets extends ResourceInterface<Gadget> {
}

These ~30 lines can then be compiled to produce a 250-line OpenAPI specification.

More robustness from less work

From even the toy example above, you can start to see the possibilities with TypeSpec, especially if you are working on APIs at scale or trying to define standards across teams. Leaders in an organization can literally set the interfaces, errors, conventions, and models in a repo for thousands of team members.

For example, If you have a specific way you want errors to be returned, it’s a few lines and then available to everybody, enforced through the compilation step. If someone tries to add their own Error model in main.tsp when they are also importing one from a library, they’ll get an error at compile time.

Here, we’ve only described a REST API and an OpenAPI specification. But emitters can be produced for any protocol, and you can extend TypeSpec exactly the way needed for your team. You can tailor it for your environment. We are doing exactly this at Zuplo.

You can check out more about TypeSpec on GitHub and play around with the language on the playground. Microsoft has written more about it here and here.

· 7 min read
Nate Totten
HTTP/1.1 403 Forbidden

We've all seen it. Whether in a browser or in Postman or in a terminal.

And we all know the drill. You start checking your credentials and your permissions. You maybe try a GET instead of a POST, and, of course, you try exactly what you tried the first time around in case you've magicked it fixed somehow.

You have to do all of this because just telling you 'Access Forbidden' isn't that helpful. You can see you don't have access, but 'Forbidden' how?

Some developers add more explicative error responses. But these are ad-hoc, with the format entirely down to that API engineering team. This leads to inconsistency and, most importantly, makes it harder for clients to understand and process the errors. APIs are supposed to be machine-readable interfaces. This lack of standardization makes it difficult for API consumers to programmatically handle different types of errors, potentially leading to more fragile and less interoperable systems.

Step in RFC 7807, Problem Details for HTTP APIs. This is a new IETF standard that helps API developers follow a simple pattern for responding to 'problem' requests. Instead of every developer having to reinvent the wheel, they can use this standard to define the details in each request.

Let's go through the details of the standard and how to implement it easily for your APIs.

The Art of Telling Bad News

Problem Details are a machine-readable object for expressing errors in HTTP APIs. It helps provide a standardized structure for error responses, making it easier for clients to understand and process the errors.

The main components of a Problem Details object are:

  • type (string, URI): A URI that identifies the specific error type. This helps clients understand the error and potentially find more information or documentation about it. Ideally, this URI should be stable and not change over time.
  • title (string): A short, human-readable summary of the problem. This should be a brief description that concisely conveys the error. The title should not change for a given "type" URI.
  • status (integer, optional): The HTTP status code generated by the origin server for this occurrence of the problem. This helps clients understand the nature of the error and how it relates to the HTTP protocol.
  • detail (string, optional): A more detailed, human-readable explanation of the problem. This can include specific information about the error and what might have caused it. The "detail" field is intended to provide context and suggestions to clients on how they might address the problem.
  • instance (string, URI, optional): A URI that identifies the specific occurrence of the problem. This can help clients and servers correlate and track individual instances of errors.

Let's say you have a credit-based SaaS tool. Users pay for credits upfront and use them up over time. When a user doesn't have enough credits to access the tool, you might return a '403 Forbidden' status:

HTTP/1.1 403 Forbidden

But on its own, this falls foul of the problems above. Neither human nor machine knows what the underlying problem is. With Problem Details, we can add a JSON object to the response with the components above:

HTTP/1.1 403 Forbidden
Content-Type: application/problem+json
Content-Language: en

{
"type": "https://example.com/probs/out-of-credit",
"title": "You do not have enough credit.",
"detail": "Your current balance is 30, but that costs 50.",
"instance": "/account/12345/msgs/abc",
"balance": 30,
"accounts": ["/account/12345", "/account/67890"]
}

Here we've used:

  • type set to https://example.com/probs/out-of-credit. The client can dereference this URI to provide more general information about this problem.
  • title set to You do not have enough credit. This gives a user a quick understanding of the specific problem.
  • detail set to Your current balance is 30, but that costs 50. This goes into more detail about the balance of the account here. Immediately, a user will understand why they are forbidden to access this page and what is needed to resolve the issue
  • instance set to /account/12345/msgs/abc. In this case, this will resolve to a log message about the specific instance of the problem. This means a client/user can use this when referencing the issue with the provider.

This set is extensible. Besides the standard fields, Problem Details objects can include custom properties that provide more information about the error. These additional properties can be application-specific and may contain any relevant data that helps clients understand or resolve the error. Here we've added:

  • balance set to 30. This tells the client the current balance of the accounts, which can be passed on to a payments portal or to the user to increase their balance.
  • accounts set to ["/account/12345","/account/67890"], telling the client the specific accounts related to this problem. Like instance (and type if needed), these are relative URIs. The client can link through to these accounts.

Here's another example from the RFC:

HTTP/1.1 400 Bad Request
Content-Type: application/problem+json
Content-Language: en

{
"type": "https://example.net/validation-error",
"title": "Your request parameters didn't validate.",
"invalid-params": [
{
"name": "age",
"reason": "must be a positive integer"
},
{
"name": "color",
"reason": "must be 'green', 'red' or 'blue'"
}
]
}

This is a good example for two reasons:

  1. It only uses the two required fields of the main members, type and title.
  2. The invalid-params property gives detailed information about what's needed for this API. This gives the client or user an instant understanding of their error and what's needed to fix.

Setting up problem details in your own APIs

Let's go through a couple of quick examples of how these can be added to APIs. As the responses are basic JSON, there is nothing special you have to do to set up Problem Details. The main preparation is enumerating your errors so you can set up types (and URIs) and titles for each, alongside any further properties (such as logs) or parameter responses such as in the 400 example above.

To set up a Problem Detail response in TypeScript, you can set up a ProblemDetails interface and then pass it in the body of the status response. Here's an example using express:

import express, { Request, Response } from "express";

// Define the Problem Details type
interface ProblemDetails {
type: string;
title: string;
status: number;
detail: string;
instance?: string;
balance?: number;
accounts?: string[];
}

const app = express();
const port = 3000;

app.get("/resource", (req: Request, res: Response) => {
// Simulate an insufficient credit check
const hasSufficientCredit = false;

if (!hasSufficientCredit) {
const errorDetails: ProblemDetails = {
type: "https://example.com/probs/out-of-credit",
title: "You do not have enough credit.",
status: 403,
detail: "Your current balance is 30, but that costs 50.",
instance: "/account/12345/msgs/abc",
balance: 30,
accounts: ["/account/12345", "/account/67890"],
};

res.status(403).json(errorDetails);
} else {
res.json({ message: "Access granted to the resource!" });
}
});

app.listen(port, () => {
console.log(`Server running at http://localhost:${port}`);
});

Same goes for Python. Here we'll use pydantic to set up the ProblemDetails class with types and server it with FastAPI. The response is sent as a dict to the client:

from fastapi import FastAPI, HTTPException
from pydantic import BaseModel
from typing import List

app = FastAPI()

# Define the Problem Details model
class ProblemDetails(BaseModel):
type: str
title: str
status: int
detail: str
instance: str = None
balance: int = None
accounts: List[str] = None

@app.get("/resource")
async def get_resource():
has_sufficient_credit = False

if not has_sufficient_credit:
error_details = ProblemDetails(
type="https://example.com/probs/out-of-credit",
title="You do not have enough credit.",
status=403,
detail="Your current balance is 30, but that costs 50.",
instance="/account/12345/msgs/abc",
balance=30,
accounts=["/account/12345", "/account/67890"]
)

raise HTTPException(status_code=403, detail=error_details.dict())

return {"message": "Access granted to the resource!"}

Easing the Pain of API Errors

Josh talked with Erik Wilde, one of the authors of RFC 7807 a few weeks ago about the impetus and implementation of the standard. Check it out here:

We recently made problem details the default format for errors on all Zuplo Gateways (overridable of course) to help our customers more easily provide better API errors. Once you start to play with these standards, you can start to see the opportunity available through Problem Details for much more robust APIs. The 'sad path' is one many users will walk, so giving them the guidance needed to find the happy path again is a great developer experience. Problem Details do just that, making your API simply more helpful and better to work with than your competitors.

· 2 min read
Josh Twist

We're working on adding support for Firebase auth to Zuplo (as we did with Supabase) and in doing so came across their JWT signing approach which is one of the more unusual. They sign their tokens with certs and they publish these certs at a well-known URL: https://www.googleapis.com/service_accounts/v1/metadata/x509/securetoken@system.gserviceaccount.com.

It took us a while to work out how to validate these JWT tokens using our preferred library: Jose.

Hopefully this will save you some time if you're trying to do the same thing. Note that we cache the certs in memory since they do not change often (hopefully!).

let publicKeys: any;

const getPublicKeys = async () => {
if (publicKeys) {
return publicKeys;
}
const res = await fetch(
`https://www.googleapis.com/service_accounts/v1/metadata/x509/securetoken@system.gserviceaccount.com`
);
publicKeys = await res.json();
return publicKeys;
};

// This goes
// inside your auth function or middleware

const authHeader = request.headers.get("authorization");
const token = authHeader.substring("bearer ".length);

const firebaseProjectId = "your-project-id";

const verifyFirebaseJwt = async (firebaseJwt) => {
const publicKeys = await getPublicKeys();
const decodedToken = await jwtVerify(
firebaseJwt,
async (header, _alg) => {
const x509Cert = publicKeys[header.kid];
const publicKey = await importX509(x509Cert, "RS256");
return publicKey;
},
{
issuer: `https://securetoken.google.com/${firebaseProjectId}`,
audience: firebaseProjectId,
algorithms: ["RS256"],
}
);
return decodedToken.payload;
};

try {
// This will throw an error if the token is invalid
const tokenData = await verifyFirebaseJwt(token);
console.log(`We got a valid token`, tokenData);
} catch (err) {
console.error(`Invalid Token`, err);
}

Hope you find that useful. Of course, you could always sign up for a free Zuplo account at portal.zuplo.com and get Firebase JWT auth as easy as configuring a policy 👏 👏 👏

· 3 min read
Josh Twist

If you have used React in the last few years you can't have avoided the useEffect react hook. It's the Batman to your Robin, the Han Solo to your Chewbacca, of the React world.

If you're unfamiliar, the useEffect hook in React is used to handle side-effects in functional components. It allows developers to perform operations such as fetching data from APIs, subscribing to events, and setting up timers. The hook runs after every render or change to dependent property, and provides a way to manage stateful logic in a relatively declarative way.

And therein lies the terror - a dependent property. It's all too easy to create a loop in React, where your useEffect causes a chain of changes that updates the dependent property which triggers your useEffect call, which causes a chain of changes that updates the dependent property which triggers your useEffect call, which causes a chain of changes that updates teh dep... you get the idea.

Here's a simple example

import React, { useState, useEffect } from "react";

function ExampleComponent() {
const [data, setData] = useState([]);

useEffect(() => {
fetch("/api/data")
.then((response) => response.json())
.then((result) => setData(result))
.catch((error) => console.log(error));
}, [data]);

return (
<div>
<ul>
{data.map((item) => (
<li key={item.id}>{item.name}</li>
))}
</ul>
</div>
);
}

export default ExampleComponent;

Note that the useEffect call declares a dependency on data but also updates that variable with setData. In most cases, these bugs are not so easy to spot and the loop is hidden by many different calls and a cascade of changes making it much harder to debug.

And notice, in this example we are invoking an API at /api/data. We just made a distributed DDoS machine. If you're lucky, this condition will always happen like in the sample above and you'll notice it immediately. If, as happened to me recently, the loop only happens when the app is in a very specific state nested in a bunch of if statements, it might make it to production. At that point, it only takes a small percentage of your user base to experience this bug for you to bring down a full DDoS on your API.

The reality is that you rarely need rate-limiting to protect from your enemies. It's nearly always your partners or in-house development team that will accidentally take your backend down. Unfortunately the nature of React and useEffect makes this more likely.

The good news is it's easy to protect yourself. You can help prevent performance degradation, reduce costs, and improve the overall user experience of your application by implementing a rate-limiting on your API. You can use an open source package like express-rate-limit or use a SaaS service like Zuplo which is fully-managed, multi-cloud and distributed (over 200 data centers worldwide) - see how to get started with rate-limiting using zuplo - you can start for free.

· One min read
Josh Twist

UPDATE See this post for a detailed walkthrough Shipping a ChatGPT plugin in record time

OpenAI recently announced Chat Plugins for Chat GPT.

To make a plugin you just need an API with an accompanying OpenAPI definition that the Chat GPT. The plugin engine is especially impressive - don't take my word for it; here's Mitchell Hashimoto, Founder of HashiCorp:

Tweet from Mitchell Hashimoto

See tweet here

If you already have an API and are excited to make it into a Chat GPT plugin there's a few things you'll need to do

  • Authentication - support auth with an API Key or OAuth2 client-id and secret.
  • OpenAPI - offer an OpenAPI definition so GPT can understand your API
  • Rate-limiting - add rate-limiting to your API (with retry-after) so OpenAI don't over-consume your resources

Fortunately, Zuplo is here to help. Zuplo is an API Gateway that natively supports OpenAPI (you can generate it using our route designer or import your own). What's more we make it easy to support API key authentication and rate-limiting, making it the fastest and easiest way for you to surface your plugin to OpenAI.

Get started for free, sign-up at https://portal.zuplo.com.

· 2 min read
Nate Totten

In light of some recent news about Docker deleting organizations and the containers that are registered with those organizations I figured I would share how we manage our Docker Containers. Zuplo uses a simple Github Action that runs on a cron schedule that mirrors containers we depend on. We initially built this because we experienced some downtime with Docker Hub that caused interruptions to our deployments. The other reason we mirror images is to keep them close to where we use them - in our case that means GCP Artifact Registry.

The Github Action is fairly simple (see below). This has worked well for us and has removed our dependency on Docker Hub for day to day deployments.

name: Mirror Docker Images
on:
workflow_dispatch:
schedule:
- cron: "0 1 * * *"

jobs:
release:
name: Mirror Images
runs-on: ubuntu-latest

permissions:
contents: "read"
id-token: "write"

env:
PROJECT_ID: my-project
REPO_NAME: docker-registry

strategy:
fail-fast: false
matrix:
image:
- "ubuntu:latest"
- "node:18-alpine3.16"

steps:
- uses: actions/checkout@v3

# Uses workload federation: https://github.com/google-github-actions/auth#setting-up-workload-identity-federation
- id: "auth-gcp"
name: "Authenticate to Google Cloud"
uses: "google-github-actions/auth@v1"
with:
token_format: "access_token"
workload_identity_provider: "your-provider"
service_account: "your-service-account"
access_token_lifetime: "300s"

- name: Set up Cloud SDK
uses: google-github-actions/setup-gcloud@v1.1.0
with:
project_id: ${{ env.PROJECT_ID }}

- name: Authenticate Docker
run: gcloud auth configure-docker us-docker.pkg.dev

- name: Pull Image from Docker Hub
run: docker pull ${{ matrix.image }}

- name: Tag Image
run: docker tag ${{ matrix.image }} us-docker.pkg.dev/${{ env.PROJECT_ID }}/${{ env.REPO_NAME }}/${{ matrix.image }}

- name: Push Image
run: docker push us-docker.pkg.dev/${{ env.PROJECT_ID }}/${{ env.REPO_NAME }}/${{ matrix.image }}

· 2 min read
Josh Twist

Welcome to OpenAPI week at Zuplo!

Zuplo <3 OpenAPI

Today we're announcing our official support for OpenAPI. Unlike other gateways, we're not simply adding an import feature for OpenAPI but are now OpenAPI native, with the format being the core of how route configuration is specified in the gateway.

Any valid OpenAPI document is a valid API Gateway configuration for Zuplo, additional properties and configuration is added via x-zuplo vendor extensions.

As a result, Zuplo now offers the most seamless workflow for API design-first teams and users of OpenAPI. For those that don't, not to worry, you'll be using OpenAPI in Zuplo but won't even notice.

Check out the demo video

Read more about this in our OpenAPI docs.

To celebrate, we're hosting an OpenAPI week with an interviews with special guests from the OpenAPI community. Sign up for the premiere of each chat below:

Darrel Miller
Darrel Miller
Editor of the OpenAPI specification and API architect at Microsoft.
On Tuesday, 3/7, we discuss the Future of OpenAPI (and some history)
Watch Darrel Miller's session here
Phil Sturgeon
Phil Sturgeon
Staff Author and co-host of APIs you won't hate
On Wednesday 3/8, we discuss living with OpenAPI in the real world
Watch Phil Sturgeon's session here
Kevin Swiber
Kevin Swiber
Marketing Chair, OpenAPI
On Thursday, 3/9 we talk about the spec wars and how OpenAPI plays a role in the API lifecycle
Watch Kevin Swiber's session here
Erik Wilde
Erik Wilde
Author, RFC 7807
On Friday 3/10 we'll look at the new(ish) Problem Details for HTTP APIs specification with one of its authors
Watch Erik Wilde's session here

These conversations will be premiering on our YouTube channel. Subscribe for notifications, follow us on Twitter or our Discord to get notified when these great conversations drop.